MagPad Dinner Table

Thursday, August 19, 2010
Dawn Wells Potato Peeling Video
Sam asked, "Isn't it easier just to peel the potato with a potato peeler?"
Garden Pasta Salad

Ingredients
- 1 (16 ounce) package uncooked tri-color spiral pasta
- 1/2 cup thinly sliced carrots
- 2 stalks celery, chopped
- 1/2 cup chopped green bell pepper
- 1/2 cup cucumber, peeled and thinly sliced
- 2 large tomatoes, diced
- 1/4 cup chopped onion
- 1 cup Italian-style salad dressing
- 1/2 cup grated Parmesan cheese
Directions
- Cook pasta in large pot of boiling water until al dente. Rinse under cold water, and drain.
- Mix chopped carrots, celery, cucumber, green pepper, tomatoes, and onion together in large bowl.
- Combine cooled pasta and vegetables together in large bowl. Pour Italian dressing over mixture, add Parmesan cheese and mix well.
- Chill for one hour before serving.
Tuesday, August 10, 2010
How to Freeze Tomatoes
What do you do when your tomato crop explodes ?
1. Give some to your friends and neighbors who would like some fresh garden tomatoes.
2. Freeze the rest to use later when you make a pot spaghetti or chili on a winter's night.
This post will tell you how to get from this....

....to this.

I found a web site that explains how to freeze tomatoes much better than I could. You can get to the site by clicking here or you can read how to do it below.
Freezing is the easiest and safest way to preserve tomatoes from your garden or the farmers market. Freezing locks in summer fresh flavor and nutrients so you can enjoy delicious tomatoes in soups and sauces all winter long!
Things You'll Need:
- Fresh tomatoes
- Serrated paring knife
- Stockpot
- Boiling water
- Large bowl of ice water
- Zip closure freezer bags
Step 1
Vine ripened tomatoes taste best fresh or frozen. If you didn't grow your own tomatoes, pay a visit to your local farmer's market for a wide selection of ripe tomatoes. Pick tomatoes that are fully colored and tender, but not mushy or soft.
Step 2
Clean the tomatoes by rinsing them individually under a stream of running water. Gently rub the surface of the fruit to remove any soil. If you aren't sure if the tomatoes are organic, wash them with a mild fruit and vegetable cleaner to help remove pesticide and herbicide residues, then rinse well.
Step 3
Pop the stem off the tomatoes. If it is stubborn, use a knife to carefully remove the stem.
Step 4
Fill a stockpot with water and bring it to a rapid boil. Dip 2 to 3 tomatoes at a time into the water. Remove the tomatoes from the pot with a slotted spoon when the skins begin to loosen (after about 30 seconds).
Step 5
Plunge the tomatoes immediately into an ice water bath. This stops the tomatoes from cooking and further loosens the skins.
Step 6
Slide the skins off the tomatoes and compost them. Use a serrated knife to remove any stubborn bits of peel and cut out the core of the tomato. At this point you can freeze the tomatoes whole or cut them into halves or quarters.
Step 7
Pack the tomatoes into freezer bags, leaving one inch of headroom at the top of the bag. Freezer bags that have a zipper seal work best. Squeeze the air of the bag and zip the top close.
Step 8
Save room in your freezer by laying the bags of tomatoes flat on a freezer shelf. Once frozen, stack the bags wherever you would like in the freezer. Frozen tomatoes stay fresh for up to one year and taste best cooked into soups, stews, and sauces.
When I do step 6, I take it one step further and after I quarter the tomatoes and put them in a big bowl. Then I take my clean hands and squish them all up. (who likes big chunks of tomatoes in your spaghetti sauce? Not my kids!) Then I ladle them into a quart ziploc bag. Walmart brand are a cheaper price. (Be sure you squeeze the air out of the bag.)
Enjoy!
Tuesday, August 3, 2010
Banana Split Cake
Crust:
2 cups graham cracker crumbs
1/2 cup butter or margarine, melted
Mix and spread into 13x9 pan. Chill
Filling:
1/2 cup butter or margarine, softened
8 oz. cream cheese, room temperature
2 cups powdered sugar
Cream together. It will crumble at first, but keep mixing until smooth. Spread on crust.
Topping:
1 container of whipped topping
1 can (15 oz.) pineapple, crushed or chunks (your choice)
1-2 bananas
Strawberries or other fruit
Ice cream topping
Nuts or toffee bits
Maraschino cherries
Slice bananas on filling, top with pineapple and then any other fruit you want. Spread with whipped topping. Drizzle with either chocolate, caramel, butterscotch sauce or favorite ice cream topping. Sprinkle with nuts and garnish with cherries.
I got this recipe off:

Pasta Veggie Fruit Salad
This is a super dish to make up in the morning. Then, when dinner time comes and everyone is hot and tired, just set this dish on the table. Voila! Dinner is served.
Pasta Veggie Fruit Salad
1 1/2 cups uncooked spiral pasta
1 1/2 cups chicken, cooked and cubed
1 1/2 cups celery, chopped
1 cup green grapes, halved
1 can (11 oz.) mandarin oranges, drained
1 can (6 oz.) water chestnuts, drained
1/4 cup green pepper, chopped
1/4 cup red onion, chopped
Dressing
1/4 cup mayonnaise
1/4 cup ranch dressing
Salt and pepper to taste
Cook the pasta. While it is cooking, chop rest of ingredients and mix. Mix dressing together. Add pasta and mix everything. Chill. Garnish with toasted slivered almonds if desired.
Living on a Dime Newsletter has done it again. I found this in my email and it looks like a great, easy, delicious summer time dish. www.LivingOnADime.com

Saturday, June 26, 2010
Table Center Piece

We had a work party at our house this this past week. I used these flower blooms from our yard as table center pieces. I was happy with the way they turned out and you can't beat the price....free! (You could also use canning jars with raffia bows to put the flowers in.)
Does any one know the name of the flowers? They are always in bloom around the 4th of July and make great center pieces this time of year.
Julie Cole let me know that this type of flower is called, agapantha. She said, "They come in purple and white....once you grow them, the 'bulbs' multiply. They are easy to separate and then you have more. Very easy to grow." Thanks, Julie for the information!
Tuesday, June 8, 2010
White Trash

- 1 1/2 lbs quality white chocolate
- 2 teaspoons vegetable shortening
- 3 cups Cheerios toasted oat cereal
- 3 cups corn or Rice Chex
- 3 cups small pretzels
- 2 cups nuts (I use unsalted dry roasted peanuts from Walmart)
- In a double boiler, melt white chocolate and shortening.
- Stir the white chocolate mixture until blended and smooth.
- In the meantime, combine all the cereal and nuts in a very large bowl.
- Pour melted white chocolate over the cereal and nuts, gently stirring to coat all pieces.
- Scoop mixture out onto large cookie sheets or jelly roll pans to set.
- After the white chocolate has hardened, break into pieces and store in a large airtight container or Ziploc-type bags.
- Enjoy!

I had this treat years ago when I attended a PTA function at Temple City High School when Scott was working there. I was told that the delicious treat I ate was called White Trash. I have looked for the recipe on and off until I finally found the recipe.
My input for the recipe is this: For the quality white chocolate that is listed above, I used Almond Bark that I got at Walmart. (It came in a 1 1/2 lb. pkg) I don't add the shortening. I don't use a double boiler to melt the almond Bark. I follow the microwave melting direction on the back of the Almond Bark package.
You will love this treat!
ps Someone asked me why I used Almond Bark instead of white chocolate. I used it because they looked like they were the same thing, except white chocolate chips were A LOT more expensive. I looked up the definition of Almond Bark on wikipedia and this is what it said:
Almond Bark (also known as vanilla flavored candy coating) is an artificial chocolate made with vegetable fats instead of cocoa butter and with coloring and flavors added. It can be found in 1.5 pound packages, in blocks, or in round discs where candy supplies or holiday nuts and crackers are sold. The confection is commonly used to cover or dip fruits, nuts, cookies, or crackers, in place of real chocolate. It can also be used with peanut butter and crackers, as with this recipe.
Monday, May 31, 2010
Whipped Cream
Ingredients:
* 1 cup heavy cream
* 1/4 cup powdered sugar
* 1 teaspoon vanilla
Preparation:
Whip cream until almost stiff. Add sugar and vanilla; beat until cream holds peaks. Spread over top of cooled pie or dollop on bread pudding, gingerbread, cobblers, or other desserts.
When I grew up, I learned how to make whipped cream by watching my mom put in a glug of vanilla and a bit of powdered sugar into the whipping cream. Several people have asked me how to make whipped cream, so I looked it up on the Internet and posted it here. Beware: if you whip the cream too much you'll turn it into butter. I think every cook has done that at least once. (I have) When ever a recipe calls for cool whip, I'll usually use whipped cream instead. Cool whip is too fake for me.
Friday, May 21, 2010
Lunches
 Click on the above newspaper and read the letter to the editor: Lunches by Mom
In case you can't read the article, this is what it says:
Lunches by Mom
The Guest View article by Trulie Ankerbery about school lunches caught my eye. (May 5) She said, “Millions of families do not have the funds to send their children to school with nutritious homemade lunches.”
I disagree with that statement.
It is possible to make nutritious homemade lunches for a minimal cost with a little time, effort, and planning. My six children are living proof of that. We don’t need another government program feeding our children their school lunches.
What we need is mothers and fathers taking care of their families.
Added Aug, 2023
In 2014 my daughter wrote an essay about, "The Power of Lunches". Click here to go to our family blog where I posted her essay. It was a payday for me.
Thursday, May 20, 2010
Californias Mormon Helping Hands Day.mp4
I know this isn't a recipe post, but SERVICE is a sure recipe for happiness. Our family was privileged to participate in the Helping Hands Service Day in California and Hawaii. A fun time was had by all. Our stake helped at the Peck Road Water Conservation Park in El Monte.
This video (produced by another stake) captures the spirit of the day. Just watching it will make you happy.
This video (produced by another stake) captures the spirit of the day. Just watching it will make you happy.
Thursday, May 13, 2010
Red Potatoes
2-3 red potatoes per person, depending on size
Butter
Parsley or green onions
Peel a strip around the middle of each potato if you want to prevent cracking. Boil potatoes until tender (about 15 minutes). Drain. Toss with butter until coated. You can sprinkle with parsley or green onions.
I got this recipe off
www.LivingOnADime.com
Bacon Pea Salad
1 pkg. (10 oz.) frozen peas, thawed
2 celery ribs, sliced
1 cup cauliflower, in small pieces
3 green onions, sliced
1/2 cup ranch dressing
1/4 cup sour cream
4 bacon strips, cooked and crumbled
1/4 cup sunflower seeds
Combine first four ingredients. Combine dressing and sour cream; pour over salad and mix well. Cover and chill for 1 hour. Before serving garnish with bacon and sunflower seeds.
I got this recipe from Living on a Dime Newsletter. ( I haven't tried it yet, but you can be sure I will.)
www.LivingOnADime.com
Lemon Custard Cake
1 prepared angel food cake (about 10 inches)
1 (3.4 oz.) box lemon pudding
1 1/2 cup milk
1 cup (8 oz.) sour cream
1 can (21 oz.) cherry or strawberry pie filling
Tear cake into pieces and place in a 13x9 pan. Mix pudding, milk and sour cream, beating until thick. Spread over cake, then spoon pie filling on top. Chill until ready to serve.
You could make this in layers in a large glass bowl for something special. This is also a good recipe to store in with your Christmas or Fourth of July recipes.
I got this recipe from Living on a Dime Newsletter. ( I haven't tried it yet, but you can be sure I will.)
Play-Dough Recipe
1 cup flour
1/2 cup salt
1 tsp cream of tarter
1 cup water
Few drops of food coloring
1 Tbs. oil
Mix dry ingredients. Mix water, food coloring and oil. Combine. Cook over medium heat, stirring constantly with large spoon until the dough pulls away from the sides of pan and forms a ball. This takes only about 30 seconds to 1 minute.
Remove to counter with a little flour on it and knead until smooth. This makes a soft dough that keeps it's shape when molded.
It will dry out but not enough to make things like jewelry. If kept in a plastic bag or airtight container in the refrigerator, it will keep for many months.
I used this recipe a lot when my kids were little. You can give the kids a rolling pin, cookie cutters, and plastic knives to use when they play with the play-dough. Add a Disney CD or other children's music and they'll be entertained for hours.
Another fun activity to do with kids that will keep them entertained for hours on a summer afternoon is to give them a paint brush (from the dollar store) and a bucket of water and have them "paint" outside. They can "paint" the sidewalk, fence, garage wall, etc.
Potato Salad
- Boiled potatoes – generally one medium or large per person
- 1 hard boiled egg – per person – for a large crowd ½ egg per person
- Cut up sweet pickles – to taste
- Green onion – to taste
- Miracle Whip salad dressing thinned down with sweet pickle juice and add a little prepared mustard.
Thursday, April 29, 2010
Benefits of Meal Time
I stumbled on another good recipe blog. It is called:
http://familyeatstogether.blogspot.com/
Click here to go the the site.
I'll also put a link to this site on My Blog List.
Speaking of meal time, there is all kinds of research that talks about the benefits of eating meals together as a family. Click here for a good article on the subject.
http://familyeatstogether.blogspot.com/
Click here to go the the site.
I'll also put a link to this site on My Blog List.
Speaking of meal time, there is all kinds of research that talks about the benefits of eating meals together as a family. Click here for a good article on the subject.
Tuesday, April 27, 2010
Yogurt Parfait
Once every few months, Scott brings breakfast to his administrative staff meeting at his work. A few times I have made yogurt parfaits for him to bring. They are so easy to make, yet look like a gourmet treat.
Below are the supplies you"ll need to make them and my commentary on where to buy what brands. You can use any brands you want. The suggestions below are just my favorites.

Smart and Final
Plastic wine glasses - package of 50 (They look like a parfait dessert cup. I also have pictured a clear plastic cup from Costco which is cheaper to buy but doesn't look as fancy)
Smart and Final brand Honey & Oats Granola w/almonds - 3 lbs. box. (You could use any brand of granola. I just like the cost and taste of Smart and Final's granola)
Fresh &Easy
I like the taste of Strawberry and Peach Yogurts from Fresh and Easy. 32 oz containers are cheaper to buy. (I also like Yoplait brand of yogurt. Usually the different grocery stores have their name brand of yogurt which is inexpensive compared to name brand yogurts.)

Layer ingredients in the glass, starting with the yogurt. As you put the middle layer of granola, use a spoon and place the granola around the edge of the cup so it will look nice from the outside of the cup after you put on the third layer, which is yogurt. Then the final layer is granola.

Delicious and yet so easy.
Below are the supplies you"ll need to make them and my commentary on where to buy what brands. You can use any brands you want. The suggestions below are just my favorites.

Smart and Final
Plastic wine glasses - package of 50 (They look like a parfait dessert cup. I also have pictured a clear plastic cup from Costco which is cheaper to buy but doesn't look as fancy)
Smart and Final brand Honey & Oats Granola w/almonds - 3 lbs. box. (You could use any brand of granola. I just like the cost and taste of Smart and Final's granola)
Fresh &Easy
I like the taste of Strawberry and Peach Yogurts from Fresh and Easy. 32 oz containers are cheaper to buy. (I also like Yoplait brand of yogurt. Usually the different grocery stores have their name brand of yogurt which is inexpensive compared to name brand yogurts.)

Layer ingredients in the glass, starting with the yogurt. As you put the middle layer of granola, use a spoon and place the granola around the edge of the cup so it will look nice from the outside of the cup after you put on the third layer, which is yogurt. Then the final layer is granola.

Friday, April 16, 2010
Pies Baked in a Jar
I ran across this recipe by accident. It looked so clever and cute I had to post the link to the recipe. Click here to see how to make these pies in a jar.


Wednesday, April 14, 2010
Freezer Jam
There are a couple of signs that let us know when spring is here at the Mag Pad. One, is when the flowers on our front hill are in bloom.
(click onto the picture to get a better view of the flowers)

Another sign of spring is when we replenish our strawberry jam supply.

Making homemade freezer jam is so easy. Just follow the directions that come in the Sure-Jell Fruit Pectin box for freezer strawberry jam. I buy the Sure-Jell Fruit Pectin box from Smart and Final along with the 8 oz plastic containers that I put the jam in. You can be sure we always make enough jam to last us until next the spring.
Please pass the peanut butter and jelly sandwich. (made with homemade strawberry jam, of course!)
March 18, 2024
The last few times I bought the Sure-Jell package, the paper with recipe isn't included inside the box, so I found the recipe online here.
Ingredients
- 2 cups crushed strawberries (buy 1 qt. fully ripe strawberries)
- 4 cups sugar, measured into separate bowl
- 3/4 cup water
- 1 pkg SURE-JELL Fruit Pectin
Instructions
Step 1
Rinse 5 (1-cup) plastic containers and lids with boiling water. Dry thoroughly. Remove and discard strawberry stems. Crush strawberries thoroughly, 1 cup at a time. Measure exactly 2 cups prepared fruit into large bowl. Stir in sugar. Let stand 10 min., stirring occasionally.
Step 2
Mix water and pectin in small saucepan. Bring to boil on high heat, stirring constantly. Continue boiling and stirring 1 min. Add to fruit mixture; stir 3 min. or until most the sugar is dissolved. (A few sugar crystals may remain.)
Step 3
Fill containers immediately to within 1/2 inch of tops. Wipe off top edges of containers; immediately cover with lids. Let stand at room temperature 24 hours. Jam is now ready to use. Store in refrigerator up to 3 weeks or in freezer up to 1 year. (If frozen, thaw in refrigerator before using.)
Wednesday, March 31, 2010
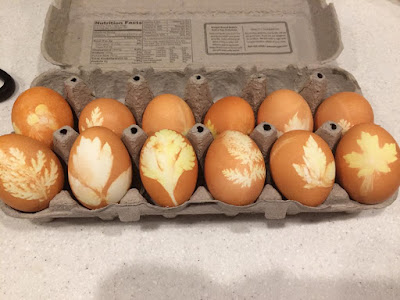
Easter Eggs Post #2

Rebecca reused the electrical tape by placing the used tape on wax paper in between doing each egg.
The homemade dye recipe Rebecca used is:
1 cup water
2 Tlbs vinegar
6-8 drops food coloring
She made the dye in the 8 oz plastic containers with lids that you can get at Smart and Final. She kept the dye in these containers and saved the dye to use for several different egg coloring sessions.
Rebecca got the idea off of Matha Stewart's Living Magazine. You can watch these eggs being made on a how to video on her webpage: marthastewart.com/dyeing-eggs
or you can click here to go to the web page.
Rebecca's husband, Landon, was REALLY cleaver and figured out how to make this egg:

Now that is a manly Easter Egg!
Tuesday, March 30, 2010
Easter Eggs
About 15 years ago Virginia Teater taught me how to color Easter eggs using all natural materials. We have been doing our Easter eggs this way every year since she taught me this method. I have taught the children in my kids' elementary classes, teenagers in my seminary class, neighbors, ladies in my church, and now the blogging world how to do this. Every egg is beautiful and unique.
Material needed:
Raw eggs
An old pair of nylons
String
Onion Skins
Flowers or leaves with space between the petals*

Put a flower in the toe of a nylon sock - facing toward you.

Put a raw egg on top of the flower in the stocking.

Bring the nylon over the egg
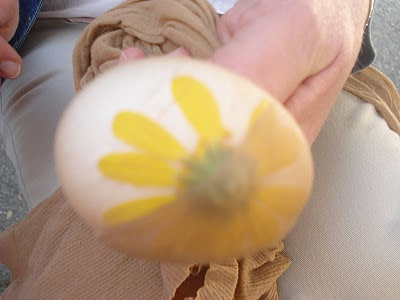
Twist the stocking and tie a piece of string in a knot at the top of the egg. This step holds the flower against the egg. This is a two person job.

Lay the eggs that are in the nylon on top of the onion skins
Material needed:
Raw eggs
An old pair of nylons
String
Onion Skins
Flowers or leaves with space between the petals*

We have Marguerite flowers growing in our yard, which work great.
Put a flower in the toe of a nylon sock - facing toward you.

Put a raw egg on top of the flower in the stocking.

Bring the nylon over the egg

Twist the stocking and tie a piece of string in a knot at the top of the egg. This step holds the flower against the egg. This is a two person job.
One person holds the nylon with the egg and the other person ties the string.

Repeat the above procedure several times up the stocking.
 Put a layer of onion skins on the bottom of a pot. (I go to my local grocery store and gather up

Repeat the above procedure several times up the stocking.

all the stray onion skins in the onion section of the produce department)

Lay the eggs that are in the nylon on top of the onion skins
(remember these are raw eggs at this point.)

Cover with water and boil the eggs for 10 to 12 minutes. (You are basically hard boiling the eggs at this point. The onion skins are coloring the eggs a beautiful golden brown color.)

When the eggs are done boiling, lift them out with tongs.

Cut the stockings.

Reveal your beautiful Easter egg

Happy Easter!

Lisa used leaves to make the designs on these eggs
(The middle one is from a celery leaf that is found in the middle of a celery stock)

Spring time is a reminder of the Resurrection
" Behold, my soul delighteth in proving unto my people the truth of the coming of Christ;... and all things which have been given of God from the beginning of the world, unto man, are the typifying of Him. (Christ)"
2 Nephi 11:4
Book of Mormon


Cover with water and boil the eggs for 10 to 12 minutes. (You are basically hard boiling the eggs at this point. The onion skins are coloring the eggs a beautiful golden brown color.)

When the eggs are done boiling, lift them out with tongs.

Cut the stockings.

Reveal your beautiful Easter egg

Happy Easter!

Lisa used leaves to make the designs on these eggs
(The middle one is from a celery leaf that is found in the middle of a celery stock)

Deseretnews.com had an article about using onion skins to color Easter eggs. One of their last steps was to "Finish the eggs off with a light coat of olive oil." I tried doing that this year and it added a nice shiny touch to the eggs.
Spring time is a reminder of the Resurrection
" Behold, my soul delighteth in proving unto my people the truth of the coming of Christ;... and all things which have been given of God from the beginning of the world, unto man, are the typifying of Him. (Christ)"
2 Nephi 11:4
Book of Mormon
*2017 update: We moved to Utah this winter and I've been on the lookout for petals type flowers and haven't found any. That is until I went to the garden department at my neighborhood Walmart. I found this plant which worked great as I made the eggs with my grandchildren this weekend:

I plucked every other petal off to make space in-between which makes a prettier design on the egg. You could also use a fern type plant with space in-between the leaves.
Monday, March 22, 2010
Red Velvete Cake

Click onto the above recipe to see a larger view.
I'm de-cluttering my piles of papers and came across this recipe I wanted to make, but haven't had a chance to yet. It looked yummy, so I thought I'd post it. If anyone tries it, let me know how it turns out.
Fruit Biscotti

Click on the above picture to see a larger version of the recipe.
I got this recipe from my Sister-in-law, Lynn, when I asked if she had a good "healthy appetizer". When she sent this recipe, she said, "It tasted yummy and wasn't very hard either. It was a little card we get in the mail, every so often, from our Real Estate guy."
I just made this recipe and in the section for the top/filling I replaced the 1/4 cup sugar with 1/2 cup powdered sugar. It made the white top/filling a little more light and fluffy.
Thursday, March 18, 2010
How Long Will This Food Store and Stay Fresh?
You've got questions. There are answers.
Moms always have all the answers and my mom has proved it once again.

(This is a picture of me and my mom that was taken this past Christmas time.)
She sent me an email with a link that has all the answers - thousands of them. Check it out by clicking here.
Below is a cut and paste of the email she sent.
How long can that bottle of ketchup stay in your fridge before it goes bad? I'm thinking 5 or 10 years. But if you want an expert opinion, go to the web site below. This site lists all kind of foodstuffs and how to keep them fresher, longer: As well as when to get rid of them. If you have a question, just click on the particular picture, and a whole list of great things appears!! WHAT A GREAT SITE THIS IS!!
www.stilltasty.com
Tuesday, March 9, 2010
How to Prepare for Financial Emergencies
The Church of Jesus Christ of Latter-day Saints has a great web page on providentliving.org about how to handle handle family finances. This web page has many links that will take you to topics on:

"We encourage you wherever you may live in the world to prepare for adversity by looking to the condition of your finances. We urge you to be modest in your expenditures; discipline yourselves in your purchases to avoid debt. . . . If you have paid your debts and have a financial reserve, even though it be small, you and your family will feel more secure and enjoy greater peace in your hearts."
—The First Presidency
Click here to go to that web page.
Here's another post on how to handling financial emergencies from:
www.LivingOnADime.com
Click here for the link that was posted on March 9, 2010 on how to be financially prepared. Below is a cut and past of the article.
- Paying Tithes and Offerings
- Avoiding Debt
- Using a Budget
- Building a Reserve
- Teaching Family Members

—The First Presidency
Click here to go to that web page.
Here's another post on how to handling financial emergencies from:
www.LivingOnADime.com
Click here for the link that was posted on March 9, 2010 on how to be financially prepared. Below is a cut and past of the article.
How to Prepare For Financial Emergencies
The best way to survive unemployment or any financial challenge is to be prepared ahead of time. Many of us prepare for all kinds of emergencies -- keeping an emergency supply of food, first aid kits and other emergency supplies. Here in Kansas, we keep one room prepared where we can go in case a tornado hits. But few of us prepare for something that is almost guaranteed to hit every one of us at some time-- unemployment.
I hope that today's ideas will inspire you to prepare for a financial emergency that is sure to happen at some point in your life in the same way you prepare for other emergencies.
As hard as it was at the time, I can honestly say that I'm glad I had the various experiences that I had with unemployment. I really wouldn't be the person I am now if I hadn't. At the time, you wonder why God is allowing these things to happen in your life and think it is so unfair but, years later, you find out many of these things taught you something that really helped you in the long run.
If my husband hadn't been laid off the first time, we wouldn't had started a business he loved. That business enabled him to be at home with the kids and me. I restarted that same business years later, which helped me save my home and helped us avoid living out on the streets. In fact, this web site wouldn't exist if it hadn't been for the job losses I experienced in my life and the things I learned from them.
The best way to rid yourself of fear and panic is to be prepared for a situation. I love the story of Joseph in the Bible (Gen. 41) where God told Joseph that there was a famine coming. What did Joseph do? Well, he didn't pay any attention to the news of the day, nor did he worry about what others were saying. He also didn't just sit there knowing that tough times were coming and say, "Que Sera Sera, what will be, will be".
He started preparing-- preparing in a big way. Maybe we don't have grain elevators to fill like he did (Well, on second thought lots of people in Kansas do :) ), but we can take practical steps now to prepare in case a "famine" should come in our lives.
I am so tired of listening to people moaning and groaning about what is going to happen to the world financially. Stop complaining about it! Take the time and energy you are wasting pointing out how awful things are and do something constructive about it in your life.
Here are a few things you can do to insulate yourself against potential financial emergencies:
- Get rid of credit card debt. I know I sound like a broken record, but credit card debt is something that can make or break you when money is tight. Once we had a gas card and furniture card, both of which were maxed out for a total of $500. The thing that hurt us the most when we had a job layoff was that credit card debt. We could have paid most of our bills with a part time job, but each month we had to make that credit card payment. It almost broke us-- and our debt was nothing compared to some others.
Don't take this lightly. You can lose everything just because of that debt. I don't care what you need to do. Get serious and aggressive about paying if off. Visit our web site and refer to our books where we give you thousands of ideas about how to do it. - It may seem impossible but stop buying on credit now. Lots and lots of people don't buy on credit and do just fine. You can too. If you don't have cash to pay for something, live without it until you can save enough for it. We can live without most things that we think we can't live without. My daughter and I have each gone through a winter without a refrigerator until we had the money to buy one. It was a pain keeping the frozen stuff in the cold garage, but we survived.
- Pay off your mortgage. If you are barely making your house payment, you may have to consider buying a less expensive house in order to accomplish that goal. The thing that saved me more than once was never buying a house I couldn't reasonably afford. Also, except for a couple of years after losing a lot of money on one house sale, I have had my house paid off since I was in my middle 30's. You can usually make enough money for minimal food and utilities in tough times, but it is the house payment that can make or break you. Pay it off and you won't have to worry about that anymore.
During the depression, the people who survived the best were the ones who had their homes paid for and had no debt. - Save. It's a toss up when it comes to deciding whether to save first and then pay your mortgage or visa versa. For me, having my mortgage paid lifted more of a burden from me. Additionally, the interest I made on my savings was so much less than the interest I paid on my mortgage that I was better off getting rid of my house payment.
Different people feel differently about their situations so do what is most comfortable for you. The most ideal thing, of course, is to pay your house off and have a small nest egg.
Don't panic when you hear the word "savings". It is so easy to think "there is no way I can save" but even if you save only $5 a week, that is something. Most people waste significantly more than that each day. I found out that having even an extra $25 helped because it could buy an awful lot of bread and bologna to feed us. - Stop worrying about things like college funds until you can get your finances under control. Those are nice to have but they aren't as big a necessity as most people think, especially when you're trying not to lose your home. If your child wants to go to college, he can go to a community college, get a scholarship or even work to pay his own way (What a concept).
- Learn useful skills. Learn how to do basic sewing, home repair, car repair, cooking and yard work. Learn to grow a garden. You may not have a need to do these things now, but someday you could find yourself thinking "I wish I knew how to ____, because it would save me so much money." Teach your children life skills as well.
- This last suggestion may seem a little odd but install a wood burning stove in your home if you don't have one. For those of you in colder climates, this can save significant money on your heating bill.
When we were in our toughest times, I don't know what I would have done if I hadn't had a wood burning stove to heat my home (or at least part of my home). The heating bill would have eaten me alive, but I could always find free wood. Even when I had to have the heater on to keep the pipes from freezing, I could keep it low enough to save me huge amounts of money.
There are so many things in our lives that we have no control over. Life happens, but there are some things we can prepare for and unemployment is one of them.
Get serious with your money and stop being foolish with it. God didn't give us prosperity solely to satisfy our "wants". It is important to use it wisely, to provide for your needs in good times and bad. Use the money you have to build a strong foundation for you family so, when the storms come, your family will be safe and can ride it out better.
Don't be selfish, spending too much of your money on things that give you instant gratifications and pleasure for the moment. Yes, you do enjoy that big screen TV, that golf game or those expensive shoes and purses, but what will you feel like further down the road when you have lost your job and have no clue on how you are going to save your home or feed your kids?
People who aren't prepared react very badly to losing their jobs. They play the blame game. It's the fault of the boss, the company, the government, the bank or these hard economic times. We play the blame game when we are caught doing something foolish or wrong. You may say, "but I did nothing wrong by losing my job." No but did you do something foolish by failing to prepare in case you did lose it?
I'm not saying any of this to judge or condemn anyone. You know your own circumstances. I'm just telling you this to try and open your eyes to the importance of being prepared, and not just because of what is going on now. Unexpected things happen all the time, but the more prepared we are, the better equipped we are to handle any financial challenge that presents itself.
Sunday, March 7, 2010
Chocolate Cinnamon Rolls

I ran across this recipe this morning. It look so good, I couldn't pass up the opportunity to post it.
Click here to get the recipe.
Saturday, March 6, 2010
Lentil Soup
INGREDIENTS:
6 cups chicken stock 2 cups dry lentils 3 tablespoons olive oil 1 tablespoon minced garlic 1 large onion, chopped 2 tsp ground cumin (more or less to taste) Other assorted chopped veggies - carrots, celery, potatoes, yams, etc. 1/2 cup chopped cilantro Lime or lemon juice |
DIRECTIONS:
| 1. | Bring chicken stock and lentils to a boil in a large saucepan over high heat, then reduce heat to medium-low, cover, and simmer for 20 minutes. |
| 2. | Meanwhile, heat olive oil in a skillet over medium heat. Stir in garlic and onion, and cook until the onion has softened and turned translucent, about 3 minutes. |
| 3. | Stir onions into the lentils and season with cumin and cayenne. Continue simmering until the lentils are tender, about 10 minutes. You can also add other chopped veggies like celery, carrots, potatoes, canned tomatoes. |
| 4. | Stir in cilantro and lime/lemon juice to taste before serving. Lentils are low in fat, high in protein and fiber and CHEAP. This soup is especially yummy if you eat it with cooked rice. |
Subscribe to:
Posts (Atom)