MagPad Dinner Table

MagPad Dinner Table
Showing posts with label Food Storage. Show all posts

Friday, May 27, 2011

A Wake Up Call From Mother Nature

Did you see the news this week?

What were you thinking when you saw the photos from
Joplin Missouri?


I'll tell you what I was thinking.....

WAKE UP!

How come I've let my pantry dwindle?

A quick trip to Costco and $150 later = peace of mind.

Do you remember how to store food in Pete recycled containers?
For a refresher course, click here.

Remember, you can never have enough water!
Read more about water storage by clicking here.


Friday, December 17, 2010

A New Recipe Blog Link

I just stumbled across another great blog. It's called: Fun with Food Storage, Finances and More.

The web address is: http://positivelyprepared.blogspot.com/ or you can click here to get to it.

The blog has links to and posts about:
  • Food storage lesson
  • Dave Ramsey's financial advice
  • Emergency preparedness ideas
  • Canning tips
  • Delicious recipies
I will also put link to the site on the side of this blog.

Thanks Katie and Lori for the great blog.

Thursday, October 14, 2010

Canned Tomatoes

Pilar Fonbuena taught a canning class in Relief Society and told us about this recipe that she got years ago. I asked her to email me the recipe. Below is a copy of the email she sent me.


Here's the recipe for the Tomato Soup. I got this from Pam Hadfield in 1980 or 1981

1 lug tomatoes = about 15 lbs (I used 23 lbs in the last batch I made)

Cook the following vegetables separately

5 onions, chopped

2 bell peppers, chopped

1 bunch celery, sliced

15 medium carrots, sliced

1 bunch parsley chopped - add to carrots after carrots are cooked

1 pkg pearled barley (I used 2 cups) - cook 10 minutes, then rinse

1 cup sugar

1/2 cup salt

Add all ingredients together with 1 cup sugar and 1/2 cup salt and simmer 10 minutes.

Bottle and process 15 minutes in steamer or water bath canner

Measurements are not exact, but turn out OK each time.

Eat soup as is, warmed up, or do the following:

I sauté garlic, onions and ground beef, then add soup, for a complete meal. May also use meat balls.

Can also stir fry zucchini, yellow crook neck and patty pan, then add soup. Delicious!

Love,

Pliar

Tuesday, August 10, 2010

How to Freeze Tomatoes

What do you do when your tomato crop explodes ?

1. Give some to your friends and neighbors who would like some fresh garden tomatoes.

2. Freeze the rest to use later when you make a pot spaghetti or chili on a winter's night.

This post will tell you how to get from this....


....to this.


I found a web site that explains how to freeze tomatoes much better than I could. You can get to the site by clicking here or you can read how to do it below.

Freezing is the easiest and safest way to preserve tomatoes from your garden or the farmers market. Freezing locks in summer fresh flavor and nutrients so you can enjoy delicious tomatoes in soups and sauces all winter long!


Things You'll Need:

  • Fresh tomatoes
  • Serrated paring knife
  • Stockpot
  • Boiling water
  • Large bowl of ice water
  • Zip closure freezer bags


Step 1

Vine ripened tomatoes taste best fresh or frozen. If you didn't grow your own tomatoes, pay a visit to your local farmer's market for a wide selection of ripe tomatoes. Pick tomatoes that are fully colored and tender, but not mushy or soft.


Step 2

Clean the tomatoes by rinsing them individually under a stream of running water. Gently rub the surface of the fruit to remove any soil. If you aren't sure if the tomatoes are organic, wash them with a mild fruit and vegetable cleaner to help remove pesticide and herbicide residues, then rinse well.


Step 3

Pop the stem off the tomatoes. If it is stubborn, use a knife to carefully remove the stem.


Step 4

Fill a stockpot with water and bring it to a rapid boil. Dip 2 to 3 tomatoes at a time into the water. Remove the tomatoes from the pot with a slotted spoon when the skins begin to loosen (after about 30 seconds).

Step 5

Plunge the tomatoes immediately into an ice water bath. This stops the tomatoes from cooking and further loosens the skins.


Step 6

Slide the skins off the tomatoes and compost them. Use a serrated knife to remove any stubborn bits of peel and cut out the core of the tomato. At this point you can freeze the tomatoes whole or cut them into halves or quarters.


Step 7

Pack the tomatoes into freezer bags, leaving one inch of headroom at the top of the bag. Freezer bags that have a zipper seal work best. Squeeze the air of the bag and zip the top close.


Step 8

Save room in your freezer by laying the bags of tomatoes flat on a freezer shelf. Once frozen, stack the bags wherever you would like in the freezer. Frozen tomatoes stay fresh for up to one year and taste best cooked into soups, stews, and sauces.


When I do step 6, I take it one step further and after I quarter the tomatoes and put them in a big bowl. Then I take my clean hands and squish them all up. (who likes big chunks of tomatoes in your spaghetti sauce? Not my kids!) Then I ladle them into a quart ziploc bag. Walmart brand are a cheaper price. (Be sure you squeeze the air out of the bag.)


Enjoy!


Thursday, March 18, 2010

How Long Will This Food Store and Stay Fresh?

You've got questions. There are answers.

Moms always have all the answers and my mom has proved it once again.

(This is a picture of me and my mom that was taken this past Christmas time.)


She sent me an email with a link that has all the answers - thousands of them. Check it out by clicking here.

Below is a cut and paste of the email she sent.


How long can that bottle of ketchup stay in your fridge before it goes bad? I'm thinking 5 or 10 years. But if you want an expert opinion, go to the web site below. This site lists all kind of foodstuffs and how to keep them fresher, longer: As well as when to get rid of them. If you have a question, just click on the particular picture, and a whole list of great things appears!! WHAT A GREAT SITE THIS IS!!


www.stilltasty.com


Tuesday, March 9, 2010

How to Prepare for Financial Emergencies

The Church of Jesus Christ of Latter-day Saints has a great web page on providentliving.org about how to handle handle family finances. This web page has many links that will take you to topics on:
  • Paying Tithes and Offerings
  • Avoiding Debt
  • Using a Budget
  • Building a Reserve
  • Teaching Family Members
I like what our First Presidency has to say on the topic:

"We encourage you wherever you may live in the world to prepare for adversity by looking to the condition of your finances. We urge you to be modest in your expenditures; discipline yourselves in your purchases to avoid debt. . . . If you have paid your debts and have a financial reserve, even though it be small, you and your family will feel more secure and enjoy greater peace in your hearts."
—The First Presidency

Click here to go to that web page.

Here's another post on how to handling financial emergencies from:

www.LivingOnADime.com

Click here for the link that was posted on March 9, 2010 on how to be financially prepared. Below is a cut and past of the article.

How to Prepare For Financial Emergencies

The best way to survive unemployment or any financial challenge is to be prepared ahead of time. Many of us prepare for all kinds of emergencies -- keeping an emergency supply of food, first aid kits and other emergency supplies. Here in Kansas, we keep one room prepared where we can go in case a tornado hits. But few of us prepare for something that is almost guaranteed to hit every one of us at some time-- unemployment.

I hope that today's ideas will inspire you to prepare for a financial emergency that is sure to happen at some point in your life in the same way you prepare for other emergencies.

As hard as it was at the time, I can honestly say that I'm glad I had the various experiences that I had with unemployment. I really wouldn't be the person I am now if I hadn't. At the time, you wonder why God is allowing these things to happen in your life and think it is so unfair but, years later, you find out many of these things taught you something that really helped you in the long run.

If my husband hadn't been laid off the first time, we wouldn't had started a business he loved. That business enabled him to be at home with the kids and me. I restarted that same business years later, which helped me save my home and helped us avoid living out on the streets. In fact, this web site wouldn't exist if it hadn't been for the job losses I experienced in my life and the things I learned from them.

The best way to rid yourself of fear and panic is to be prepared for a situation. I love the story of Joseph in the Bible (Gen. 41) where God told Joseph that there was a famine coming. What did Joseph do? Well, he didn't pay any attention to the news of the day, nor did he worry about what others were saying. He also didn't just sit there knowing that tough times were coming and say, "Que Sera Sera, what will be, will be".

He started preparing-- preparing in a big way. Maybe we don't have grain elevators to fill like he did (Well, on second thought lots of people in Kansas do :) ), but we can take practical steps now to prepare in case a "famine" should come in our lives.

I am so tired of listening to people moaning and groaning about what is going to happen to the world financially. Stop complaining about it! Take the time and energy you are wasting pointing out how awful things are and do something constructive about it in your life.

Here are a few things you can do to insulate yourself against potential financial emergencies:

  • Get rid of credit card debt. I know I sound like a broken record, but credit card debt is something that can make or break you when money is tight. Once we had a gas card and furniture card, both of which were maxed out for a total of $500. The thing that hurt us the most when we had a job layoff was that credit card debt. We could have paid most of our bills with a part time job, but each month we had to make that credit card payment. It almost broke us-- and our debt was nothing compared to some others.

    Don't take this lightly. You can lose everything just because of that debt. I don't care what you need to do. Get serious and aggressive about paying if off. Visit our web site and refer to our books where we give you thousands of ideas about how to do it.

  • It may seem impossible but stop buying on credit now. Lots and lots of people don't buy on credit and do just fine. You can too. If you don't have cash to pay for something, live without it until you can save enough for it. We can live without most things that we think we can't live without. My daughter and I have each gone through a winter without a refrigerator until we had the money to buy one. It was a pain keeping the frozen stuff in the cold garage, but we survived.

  • Pay off your mortgage. If you are barely making your house payment, you may have to consider buying a less expensive house in order to accomplish that goal. The thing that saved me more than once was never buying a house I couldn't reasonably afford. Also, except for a couple of years after losing a lot of money on one house sale, I have had my house paid off since I was in my middle 30's. You can usually make enough money for minimal food and utilities in tough times, but it is the house payment that can make or break you. Pay it off and you won't have to worry about that anymore.

    During the depression, the people who survived the best were the ones who had their homes paid for and had no debt.

  • Save. It's a toss up when it comes to deciding whether to save first and then pay your mortgage or visa versa. For me, having my mortgage paid lifted more of a burden from me. Additionally, the interest I made on my savings was so much less than the interest I paid on my mortgage that I was better off getting rid of my house payment.

    Different people feel differently about their situations so do what is most comfortable for you. The most ideal thing, of course, is to pay your house off and have a small nest egg.

    Don't panic when you hear the word "savings". It is so easy to think "there is no way I can save" but even if you save only $5 a week, that is something. Most people waste significantly more than that each day. I found out that having even an extra $25 helped because it could buy an awful lot of bread and bologna to feed us.

  • Stop worrying about things like college funds until you can get your finances under control. Those are nice to have but they aren't as big a necessity as most people think, especially when you're trying not to lose your home. If your child wants to go to college, he can go to a community college, get a scholarship or even work to pay his own way (What a concept).

  • Learn useful skills. Learn how to do basic sewing, home repair, car repair, cooking and yard work. Learn to grow a garden. You may not have a need to do these things now, but someday you could find yourself thinking "I wish I knew how to ____, because it would save me so much money." Teach your children life skills as well.

  • This last suggestion may seem a little odd but install a wood burning stove in your home if you don't have one. For those of you in colder climates, this can save significant money on your heating bill.

    When we were in our toughest times, I don't know what I would have done if I hadn't had a wood burning stove to heat my home (or at least part of my home). The heating bill would have eaten me alive, but I could always find free wood. Even when I had to have the heater on to keep the pipes from freezing, I could keep it low enough to save me huge amounts of money.

There are so many things in our lives that we have no control over. Life happens, but there are some things we can prepare for and unemployment is one of them.

Get serious with your money and stop being foolish with it. God didn't give us prosperity solely to satisfy our "wants". It is important to use it wisely, to provide for your needs in good times and bad. Use the money you have to build a strong foundation for you family so, when the storms come, your family will be safe and can ride it out better.

Don't be selfish, spending too much of your money on things that give you instant gratifications and pleasure for the moment. Yes, you do enjoy that big screen TV, that golf game or those expensive shoes and purses, but what will you feel like further down the road when you have lost your job and have no clue on how you are going to save your home or feed your kids?

People who aren't prepared react very badly to losing their jobs. They play the blame game. It's the fault of the boss, the company, the government, the bank or these hard economic times. We play the blame game when we are caught doing something foolish or wrong. You may say, "but I did nothing wrong by losing my job." No but did you do something foolish by failing to prepare in case you did lose it?

I'm not saying any of this to judge or condemn anyone. You know your own circumstances. I'm just telling you this to try and open your eyes to the importance of being prepared, and not just because of what is going on now. Unexpected things happen all the time, but the more prepared we are, the better equipped we are to handle any financial challenge that presents itself.

Friday, March 5, 2010

Informational booklet on Emergency Survival


(Click onto above picture to be able to read about what you can learn from the booklet.)
Can you tell I'm betting ready to do another class on emergency preparedness? There is such a wealth of information out there on the Internet. I came across a booklet from the Los Angeles County, Office of Emergency Management that has simple short ideas that a family can go through to get themselves emergency prepared.

Each chapter has a simple 1-2 paragraph explanation of what to do. On the next page they have a check list of how a family can get prepared in that area.

Here is a list of the chapters:

Step 1. Family Emergency Plan
Step 2 Supply Storage
Step 3 First Aid Training and Supplies
Step 4 Drop, Cover and Hold On
Step 5 Car Kit and Office Kit
Step 6 Emergency Cash and Important Documents
Step 7 Camping Out Earthquake Style
Step 8 Freshen up your Water and Food Supplies
Step 9 Focus on Children
Step 10 Learn not to Burn
Step 11 Emergency Lighting
Step 12 Gifts of Life

This is an excellent booklet to go through as a family to set some goals for emergency preparedness. They have thought of everything in this booklet in a simple uncomplicated way.

Earthquake Preparedness


For some reason, earthquake preparedness has been on my mind. I wonder if this news story has anything to do with my thoughts?

A massive 8.8-magnitude earthquake rocked Chile early on Saturday, February 27, leaving hundreds of people dead, destroying parts of southern Chile and triggering tsunami warnings for the entire Pacific basin. cnn.com

I found a blog post from Emergency Essentials on earthquake preparedness that is worth reading. click here to read the post.

Monday, March 1, 2010

Kristine's first hand experience with emergency preparedness

tsunami:  are you on high ground?
By Janelle Anderson

My sister Kristine is in the yellow shirt below.
She lives in Laie, Hawaii and goes to BYU-Hawaii.
Her house is right on the beach...

...and Saturday morning, she evacuated with her roommates
because of the tsunami warning triggered by the earthquake in Chile.
They decided to go to "higher ground."
How appropriate that that "higher ground" is the hill the temple is on
(see middle right of the picture).
Quote from Kristine: "It was really interesting seeing everybody on the hill, all the families, my professor’s families, students, and the Polynesians with their full on tarps, BBQs, and music. A lot of people had tents which I thought was really smart."

I think this picture is cool: there were men on top of the temple with cameras looking for the waves to start.
Kristine was prepared well by our mother (mom is the emergency queen). Kristine said all her roommates were teasing her about bringing so much "stuff." Kristine said, "but I didn't mind because it was true, I brought a TON of stuff but I knew if we were stranded up there we would use everything."

Having "stuff" is smart! She brought a pillow, quilt, chairs, tons of water, boatload of food, journal, school stuff, laptop, cell phone charger, $100 cash, can opener, pocket knife, first aid kit, soap, washcloths, camera, flashlight, clothes, and a tarp.

I bet she's smiling so big cuz she knows she's prepared :-)

There was even opportunity to "play." The sprinklers went off on their "campsite" and so they cooled off a bit.
So, what ended up happening? Where was the tsunami?

It didn't come. The water levels at Laie rose about a foot.
Kristine went home about 2:30pm.

But the experience was still valuable.

Kristine says: "I must say I am really grateful for this experience, seriously. I want to tell you all I have a testimony of food storage and flee bags, amen.

Dave's brother, Matt, and his family also live on the island.
They were prepared with 72-hour kits and extra water.
After the warning was lifted, they headed to the beach "to surf the big tsunami waves."

Matt says, "It was exciting, but kind of anti-climatic in a good way that there was no damage or injuries... unless you count a few fist-fights at the gas stations when people were trying to "stock up."
Good point for Matt to make: anti-climatic if you're prepared.
If you have food storage, water, a car full of gas, why fear?
When an emergency comes, will you be standing in a two hour line for food? Looking for bottled water on a shelf that's picked clean? Waiting to fill up a car at a station jammed packed?

Kristine's and Matt's experience taught me to be prepared.

Because even if a tsunami doesn't come, I'll have peace of mind.

And part of being prepared--spiritually--is getting to that higher ground.

The temple.
Laie, Hawaii temple


Friday, February 5, 2010

Winter gardens are one of the blessing of living in So. California.


Winter gardens are the best!

There's nothing like a fresh lettuce salad for dinner.

For the lettuce, you just pick the outer leaves and they grow all season long until the plants start to go to seed. If you have home grown lettuce a salad spinner is a must. You can pick a spinner up at Bed, Bath, and Beyond. Target or Walmart might also carry salad spinners.

In the front row are carrots, then lettuce and then peas. (The peas are growing up a wooden frame with fishing line going from the top to bottom for the peas to climb up.) I also wanted to plant broccoli, onions, and cilantro but I just didn't get around to planting them this year. ...maybe they will make it into my spring garden.

Saturday, November 7, 2009

Another food storage blog

I ran across another food storage blog. Click here to see it.

It is called idareyoutoeatit.com

Check out the recipe section.

Wednesday, October 28, 2009

Emergency Car Kits (one for every car you own/drive)

-Box to hold everything
-Water (at least 1 bottle per seat belt in the car, preferably more during the summer or if you live in a hot climate)
-High-energy snacks
-Flashlight
-Batteries (store outside flashlight for longer shelf life)
-Wet wipes
-Toilet paper roll (store easily by rolling off the roll onto your hand and place in a ziplock bag)
-Basic first aid kit
-Blanket/towels
-Change of clothes for children (or yourself if you want)
-Diapers (if you have children)
-Umbrella and/or rain poncho
-Scriptures (or a classic book for reading)
-Jumper cables
-Hand sanitizer
-Pen & Paper
-Pocket knife
-$5-$20 cash (and change)

I got this list off of one of my favorite blogs on food storage. It was on their cold weather preparedness post. Click here to read the complete post.

Friday, September 18, 2009

Some Items Everyone needs in their Food Storage...

I really like this food storage blog. I like how they think about food storage.


I already have these items in my food storage pantry.


Y'all are invited over to my house after the next earthquake and we'll have some of these....


Click here to see the recipe.

Saturday, June 13, 2009

Awesome Food Storage Blog

I just ran across the most wonderful food storage blog. I wanted to share the address on my blog.

http://safelygatheredin.blogspot.com/

You might want to bookmark this one. It looks like a great reference for food storage. I will also post it on the side of my home page.

Friday, May 15, 2009

Family Home Storage: A New Message


Being a member of the Church of Jesus Christ of Latter-day Saints all my life, I have always been taught about preparedness and food storage. I'm grateful for the teaching from our church leaders on this subject. I appreciate a new article that the church has published on family home storage. You can read the entire article by clicking here. Below is a cut and paste of the highlights that I liked from the article.

“We can begin ever so modestly,” President Hinckley explained. “We can begin with a one week’s food supply and gradually build it to a month, and then to three months.”1

Sister Jeffries notes that “the beauty of this system is its appropriateness for families just starting their storage programs, as well as for those living in small homes and apartments, where space is at a premium. President Hinckley clearly recognized that change and adaptation are needed so that all of us might benefit from the Lord’s inspired program.”

A New Approach

In the spirit of President Hinckley’s remarks, Church leaders decided to closely reexamine their approach to self-reliance, looking for ways to reinforce the concepts of home storage and financial preparedness. As a result, the Church published the pamphlet All Is Safely Gathered In: Family Home Storage, outlining new guidelines for home preparedness that give Church members a simplified, four-step approach to building their home storage.

They are as follows:

1. Gradually build a small supply of food that is part of your normal, daily diet until it is sufficient for three months.

2. Store drinking water.

3. Establish a financial reserve by setting aside a little money each week, and gradually increase it to a reasonable amount.

4. Once families have achieved the first three objectives, they are counseled to expand their efforts, as circumstances allow, into a supply of long-term basic foods such as grains, legumes, and other staples.

Of the new guidelines, Presiding Bishop H. David Burton says, “Our objective was to establish a simple, inexpensive, and achievable program that would help people become self-reliant. We are confident that by introducing these few, simple steps we can, over time, have more success.”

Guideline 1: Build your three-month supply gradually.
Start small and do the best you can. Begin by purchasing a few extra items to add to your storage each week. Strive to build a one-week supply; then expand it to a one-month supply, then a three-month supply. By building your supply slowly, you can avoid financial strain and start down the path toward self-reliance.

The Lugo family of Valencia, Venezuela, learned that this new approach of starting small and being consistent can pay big dividends. After listening to general conference, Brother Omar Lugo, a Church member in the Falcón Venezuela District, felt inspired to begin his own home storage. He discussed the matter with his family, and they agreed to follow the prophet’s counsel.

They began setting aside food, water, and money, a little at a time. At first the difference was hardly noticeable. But after a while the Lugos found that they had accumulated a substantial reserve. Several months after they began building their home storage, a worker’s strike in Venezuela put many local workers’ jobs in jeopardy. Brother Lugo was among those who eventually lost their jobs.

For a time his family lived on savings. Seven months later the Lugo family was relying exclusively on the food they had stored. It took nearly two years for Brother Lugo to find work again, but his family was able to survive the difficult challenges of unemployment. They had built their reserve gradually, and when adversity struck, they were prepared and the Lord blessed them.

Like the Lugo family, Church members will be blessed for their obedience to the First Presidency’s counsel as they gradually build home storage. “We ask that you be wise as you store food and water and build your savings,” the First Presidency explains. “Do not go to extremes; it is not prudent, for example, to go into debt to establish your food storage all at once.” Rather, they suggest a modest, consistent approach. “With careful planning, you can, over time, establish a home storage supply and a financial reserve.”2

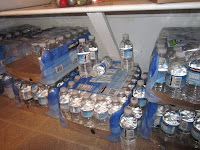
Guideline 2: Store drinking water.

In times of need, having water to drink can be the difference between life and death—or at least between peace and anxiety. Just ask the Kawai family, members of the São Paulo Brazil Stake. They have been storing food and water for 20 years. Although their small apartment doesn’t have much room to spare, the Kawais decided to make home storage a priority.

Sister Kawai tells of one experience when that decision paid off. “I was in the hospital having just given birth when I learned that there was a problem with the city’s water pipes,” Sister Kawai explains. “Hundreds of thousands of people were without water. But I wasn’t concerned about going home. I had peace of mind knowing that my family would have water to drink.”

Guideline 3: Set aside a little money.

From the First Presidency comes this counsel: “We encourage you wherever you may live in the world to prepare for adversity by looking to the condition of your finances. We urge you to be modest in your expenditures. … Save a little money regularly to gradually build a financial reserve.”3

In the April 2007 general conference Bishop Keith B. McMullin, Second Counselor in the Presiding Bishopric, reinforced this principle, exhorting Church members to “save some money, if only a few coins each week. This modest approach will soon enable them to have several months’ reserve.”4

By gradually building a financial reserve, we will be prepared for unforeseen trials and have an added measure of security and peace in our hearts.

Guideline 4: Where possible, gradually establish a longer-term supply.

“For longer-term needs,” explains the All Is Safely Gathered In pamphlet, “gradually build a supply of food that will last a long time and that you can use to stay alive, such as wheat, white rice, and beans.”5

Establishing long-term storage is easier than some might think. Dr. Oscar Pike and his colleagues in the Brigham Young University Department of Nutrition, Dietetics, and Food Science have done several in-depth studies on long-term food storage. They discovered something surprising: properly packaged and stored low-moisture food retains much of its sensory (taste) quality and nutritional value for 20 to 30 or more years after being placed in storage—much longer than previously supposed.

This means Church members can store certain foods long-term without the worry of regularly rotating the food. They can be confident that their supply will be there to keep them alive if they have nothing else to eat.

The Time to Begin Is Now

“Perhaps in the past accumulating a year’s supply of food may have been a little intimidating and even illegal in some places,” says Dennis Lifferth, managing director of Church Welfare Services. “But this new approach asks us to do the best we can, even if all we can do is to set aside a can or two each week. If the prophet asks us to do something, we can find a way to fulfill the commandment and receive the blessings.”
“This new program is within everyone’s grasp,” explains Bishop Burton. “The first step is to begin. The second is to continue. It doesn’t matter how fast we get there so much as that we begin and continue according to our abilities.”

Prophetic Counsel about Home Storage

“Many more people could ride out the storm-tossed waves in their economic lives if they had their … supply of food … and were debt-free. Today we find that many have followed this counsel in reverse: they have at least a year’s supply of debt and are food-free.”

President Thomas S. Monson, “That Noble Gift—Love at Home,” Church News, May 12, 2001, 7.

“Everyone who owns a home recognizes the need for fire insurance. We hope and pray that there will never be a fire. Nevertheless, we pay for insurance to cover such a catastrophe, should it occur. We ought to do the same with reference to family welfare.”

President Gordon B. Hinckley (1910–2008), “To Men of the Priesthood,” Liahona and Ensign, Nov. 2002, 58.

“In the day of plenty, prepare for the day of scarcity.”

First Presidency, “Message of the First Presidency,” in Conference Report, Apr. 1942, 89.

“Learn to sustain yourselves; lay up grain and flour, and save it against a day of scarcity.”

President Brigham Young (1801–77), Discourses of Brigham Young, sel. John A. Widtsoe (1954), 293.

Notes
1. Gordon B. Hinckley, “To Men of the Priesthood,” Liahona and Ensign, Nov. 2002, 58.
2. All Is Safely Gathered In: Family Home Storage (2007), 1.
3. All Is Safely Gathered In: Family Finances (2007), 1.
4. Keith B. McMullin, “Lay Up in Store,” Liahona and Ensign, May 2007, 53.
5. All Is Safely Gathered In: Family Home Storage, 2.

PETE Bottles for Food Storage


Below is a cut and paste from the provident living that explains how to store food in plastic containers. You can get to the post by clicking here then click onto the PETE Bottles Link. If you want to learn about recycling symbols click here and scroll down to where it explains about PETE symbols.

PETE Bottles for Longer-Term Storage

Bottles made of PETE (polyethylene terephthalate) plastic can be used with oxygen absorbers to store products such as wheat, corn, and dry beans. PETE bottles are identified on the container with the letters PETE or PET under the recycle symbol (see above picture).

Other types of plastic bottles typically do not provide an adequate moisture or oxygen barrier for use with oxygen absorbers. Do not use containers that were previously used to store nonfood items.

PETE bottles can also be used for shorter-term storage (up to 5 years) of other shelf-stable dry foods such as white rice. Visit providentliving.org for specific product recommendations.
Moisture content of stored foods should be about 10 percent or less. When moist products are stored in reduced oxygen packaging, botulism poisoning may occur.

Packaging in PETE Bottles

1. Use PETE bottles that have screw-on lids with plastic or rubber lid seals. You can verify that the lid seal will not leak by placing a sealed empty bottle under water and pressing on it. If you see bubbles escape from the bottle, it will leak.
2. Clean used bottles with dish soap, and rinse them thoroughly to remove any residue. Drain out the water, and allow the bottles to dry completely before you use them for packaging food products.
3. Place an oxygen absorber in each bottle. The absorbers can be used with containers of up to one-gallon capacity (4 liters). Additional instruction about using oxygen absorbers is available at providentliving.org. (This is now Kathleen typing - I don't do this step when I am storing food for my 3 month supply. I have found that the oxygen absorbers work in PETE containers only if the lids to the containers have a rubber ring on them at are found on containers such as a gallon water jug.)
4. Fill bottles with wheat, corn, or dry beans.
5. Wipe top sealing edge of each bottle clean with a dry cloth and screw lid on tightly.
6. Store the products in a cool, dry location, away from light.
7. Protect the stored products from rodents.
8. Use a new oxygen absorber each time you refill a bottle for storage.
Where to Get Oxygen Absorber Packets

Oxygen absorber packets are available at home storage centers and Church Distribution Services, or they can be ordered online at ldscatalog.com. Unused oxygen absorbers can be stored in glass jars with metal lids that have gaskets.


This picture is a sample of some of the things I have stored in PETE containers. (Click onto the picture to see a close up of the items stored, AND, yes! chocolate chips are an important item in our 3 month food supply).

After reading this post you will soon learn to recognize #1 PETE recycled containers as compared to a #2 PETE recycled container. (An example of a #2 recycled container is a milk jug.)

This post comes from cut and past off the church web page: providentliving.org. Learning about PETE storage containers has changed the way I do our family's food storage. I use PETE #1 containers to store the food that we use regularly. Using the PETE containers has made it easier for me to rotate the staples we use most. I take a permanent marker and date the container each time I fill it. The items I store in PETE containers would include items such as: Rice, Oats, sugar, flour, cereal, jello, popcorn, cornmeal, powdered sugar, noodles, etc. I use the wide mouth containers for items that as I need to scoop out with a measuring cup, such as flour. I use the small opening containers for items that I can pour out such as white sugar. I order the wide mouth PETE container, on line from www.FreundContainer.com - item #34798. For the small opening containers that I can pour the food out of such as rice, I use recycled l gallon PETE water bottles such as a Crystal Geyser containers.

Wednesday, May 13, 2009

Farming in the City


Here in the big city of Duarte, we can enjoy fresh garden vegetables year round. In the winter we like to grow lettuce, peas, broccoli, and cilantro. In the summer we grow tomatoes, bell peppers, squash, cucumber, pumpkins, strawberries, lettuce, peas, zucchini, cilantro, cucumbers, carrots, green beans and what ever else looks good in the vegetable pony packs in the garden department at the Home Depot or Walmart. Some plants I start from seeds, such as cilantro and lettuce. Other plants I use the pony packs such as tomatoes and peppers.


Below are some pictures of city farming here in Duarte:


My neighbor, Rebecca Seamons has a nice grow box in her back yard. The first picture above is where she planted basil by her tomatoes plants to keep away the bugs.


In this grow box she has bell peppers, squash, and strawberries.


This is in our backyard. To the left are strawberries. To the right are peas and tomatoes.
This garden plot is along our back fence. In this shot you can see cucumbers, lettuce, red peppers, tomatoes and squash.

This is a picture of our compost pile between our two citrus trees. We throw our lawn clippings, and kitchen scraps such as melon rinds and carrot peels there. When it breaks down, we add the soil to our garden plots.


There are many gardening tips at providentliving.org Have fun!

Tuesday, May 12, 2009

WATER: The most important food storage item

Water is the most important item in our food storage. The question is where do we store all the water without a basement or cool storage room? (We live in So. California)

As we store our water, we are ever mindful to rotate our supply of bottled water. Every time we purchase a case of water it is dated with a permanent marking pen. As we take a bottle of water, we grab one from the oldest purchased water.

I wanted to share some of the places where we store our water in our house.

These cases of bottled drinking water are stored on the bottom shelf in our toy closet.

These gallon jugs are stored in the bottom of our hall coat closet. (We also have water stored in our guest room closet) As we are done with the gallon jugs, I put them on my kitchen window sill to dry out and then use them to store food storage items such as sugar, rice, or oats . (See earlier PETE food storage post here.)

These 5 - 55 gallon water barrels are in our garage along the back wall. The shelves above them store our camping equipment for easy emergency access. We change the water every 6 months (that's the plan - I think it's more like once a year) We add 2 Tbs. of bleach to every 55 gallon barrel of water when we change the water.)

You can read more about water storage on providentliving.org by clicking here

Friday, March 20, 2009

Rachel's Cinnamon-Raisin Bread

6 cups white flour
6 to 7 cups wheat flour
2 cups raisins
6 Tbs sugar
1 Tbs Salt
1/4 cup shortening
4 packages OR 4 Tbs. regular or quick active dry yeast.
4 1/2 cups very warm water (120 to 130 degrees)
1/2 cup sugar mixed with 1 Tbs ground cinnamon.

1. Mix the white flour, sugar, salt, shortening and yeast in large bowl. Add warm water. Beat with electric mixer on low speed 1 minute, scraping bowl frequently. Beat on medium speed 1 minute, scraping bowl frequently. Stir in the wheat flour, 1 cup at time, to make dough easy to handle.

2. Turn dough onto lightly floured surface. Knead about 10 minutes or until smooth and elastic. Place in greased bowl and turn greased side up. Cover and let rise in warm place 40 to 60 minutes or until double. Dough is ready if indentation remains when touched.

3. Grease 4 load pans with shortening or Pam cooking spray.

4. Punch down dough and divide in fourths. Flatten each forth with hands or rolling pin to rectangle, 18 x 9 inches on lightly floured surface. Sprinkle each with 1 Tbs. water and 1/4 cinnamon sugar mixture. Roll dough up tightly, beginning at 9-inch side to from a loaf. Place seam side down in pan. Cover and let rise in warm place 35 to 50 minutes or until double.

5. Heat oven to 400 degrees. Bake 25 to 30 minutes or until ooaves are deep golden brown and sound hollow when tapped. Remove from pans to wire rack.

Rachel got this recipe out of the Betty Crocker Cook Book. It is always a treat when she makes this bread.

Saturday, December 13, 2008

Whole-Wheat-Oatmeal Pancakes

Makes 8-10 pancakes.

2 eggs, separated
2 TBS oil
1 cup oats
1 cup water

Beat egg whites until stiff. Set aside. Combine egg yolks, water, oil and oats. Beat slightly and allow to stand for 5 minutes.

While waiting, stir together:

1/2 cup whole wheat flour
2 tsp baking powder
1/4 tsp salt
2 TBS sugar
1/3 cup dry nonfat milk powder

Add wet ingredients, mix together. Fold in egg whites. Cook on griddle.

This is from my healthy roommate college days. Ruth bought a cookbook from a food storage place and we had fun trying out different recipies.