MagPad Dinner Table

MagPad Dinner Table

Tuesday, December 15, 2009

Energy Bars (Homemade Granola Bars)


1 10 oz. pkg. miniature marshmallows or 40 large marshmallows
1/2 cup margarine or butter (I use butter)
1/2 cup creamy peanut butter
1 1/2 cups raisins
1 cup unsalted peanuts (I used the WalMart unsalted dry roasted peanuts)
2 cups quick oats
2 1/2 cups rice krispies

Toast oats and rice krispies in a Teflon coated skillet or warm in 200 degree oven. (optional)  Melt marshmallows, butter and peanut butter in a large pot over low heat. Add raisins and peanuts; stir. Add oats and rice krispies to mixture (Work quickly as mixture hardens fast.) Spread mixture in buttered 9x13 pan. (I like to spread mixture in a 10 x 15 jelly roll pan. It doesn't make the bars as thick.)


These are the granola bars
wrapped in wax paper ready to serve

We went caroling last night with the Cornwalls and Steimles. April brought these bars wrapped in wax paper to put on our fruit baskets. (We decided to deliver healthy baskets this year with home grown citrus and avocados.) A fun time was had by all.

Wednesday, December 2, 2009

Please pass the cream

Today's Tips:

If you have a small amount of whipped topping left over, place dollops of it on a wax paper and freeze. Then place in an air tight container. When you need a quick topping for a dessert or some to go on a late night cup of hot cocoa you can just grab one out of the freezer.

I got this off the webpage "Living On a Dime Newsletter". Anyone who know me (my kids) know I love real cream. This is a better idea for my waist line than just downing the leftover cream.

Tuesday, December 1, 2009

Soupy Turkey Madness

Dump all these ingredients in a pot and simmer.  Everything is to taste (sorry).  2-4 servings.

leftover turkey, cubed/diced, however much you want
1 can cream of chicken soup
milk, 1 cup-ish
frozen peas, lots (yum!)
2 baked/boiled potatoes, peeled and diced
curry, 1-2 tsp (or more?? be generous!  this is what makes it good!)
crushed red pepper, couple shakes
pepper

One starving Lisa + leftover turkey = culinary masterpiece!  I didn't measure anything, so the quantities are...open to interpretation.

Saturday, November 21, 2009

Grout Cleaner

By Linda Cobb, queenofclean.com

Make a paste of 2 parts baking soda, 1 part borax and 1 part hot water. Add the water as necessary to form a thick paste. Apply this paste to the grout, and scrub with a scrub brush. To make the job easier, use a scrub brush on a handle. Then rinse well.

For cleaning the tile, you should remember that ceramic tile is to porous. You can clean it effectively with warm water. Many commercial cleaners leave a residue on the tile surface that looks like a smeary coating. A good, neutral cleaner for tile is a solution of 1 gallon of warm water, 2 tablespoons of ammonia, and 1 tablespoon of borax. Never use vinegar. It is an acid and will eventually etch the grout. You should never use a sponge mop on ceramic title, either. It works like a squeegee, depositing the dirty water into the grout tracks. Sweep or vacuum the floor prior to washing. A micro fiber mop works wonders on tile. Check out the Act Natural Mop at www.euronetusa.com. I have been using one for four years and love it. And you don’t need anything except water. When both your tile and grout are clean, you can seal the grout.

I got this out of the paper a few years back. Scott cleaned my entryway today with this grout cleaner and it looks great!

Wednesday, November 18, 2009

Roasted Chicken with Wild Rice Soup

Ingredients

1 box of Uncle Ben's Wild Rice Mix cooked
1 Tbsp of Olive Oil
1 cup of diced red onion
1 cup of chopped celery
1 cup of chopped carrots
2 garlic cloves minced
1/4 cup of flour
1 8 oz package of mushrooms sliced and clean (optional, I did not use them, yuck!)
1/2 tsp. of thyme
1/2 tsp of tarragon
2 cups of water
2 cans of chicken broth (the size that just a bit bigger than a soup can)
12 oz. can of evaporated milk
2 Tbsp of dry sherry (optional, again I did not use this, and it turned out just fine!)
3 cups of shredded chicken ( I buy a pre roasted chicken from Costco)

Steps
1- Prepare rice mix according to box instructions
2- Heat oil in a large pot over medium heat. Add onions, carrots, celery, mushrooms, and garlic. Cook for 8-10 minutes.
3- Stir in flour for 1 minute and and taraggon and thyme
4- Add liquids- chicken broth, water, sherry, and milk.
5- simmer for 20 min.
6- Add shredded chicken and cooked rice and cook for another 10 min. or until ready to serve.

Kathleen’s changes:
I used canola oil instead of olive oil. I got the spices from smart and final. I used a Costco chicken, boiled the bones and skin and used that for the broth. (It might need more salt if you don’t use the canned broth.) I didn’t use the Sherry. I don’t like it with canned milk. It tastes ok without any milk. I think you could add cream or half and half, or milk and it would taste good.

I got this recipe off the Jone's family recipe blog. It is yummy! I'm going to serve it tonight when I feed the missionaries.

Saturday, November 14, 2009

Funeral Potatoes

Ingredients

1 package (around 26 Oz.) Shredded Frozen Hash Browns Or 6 Medium Potatoes (Peeled, Cooked, Cooled And Grated)
1 can Cream Of Chicken Soup
1 cup Sour Cream
½ cup Milk
1/2 cup To 1 Cup Shredded Cheddar Cheese
1 whole Small Onion Chopped
2 cups Bread Crumbs
1 cup Grated Parmesan Cheese
½ cups Butter, Melted

Mix together the potatoes, soup, sour cream, milk, cheese and onions. Spread it into a greased 9 x 13 dish.
Mix the bread crumbs and Parmesan with the melted butter. Spread it over the top of the casserole.
Bake at 350°F for 45 minutes or until bubbly.
This freezes well, too. Make it in two 8 x 8 pans and freeze one.

Recipe linked here.

When I make this recipe, I like to use the potatoes that are cooked, peeled and grated.

Saturday, November 7, 2009

Another food storage blog

I ran across another food storage blog. Click here to see it.

It is called idareyoutoeatit.com

Check out the recipe section.

Wednesday, October 28, 2009

Emergency Car Kits (one for every car you own/drive)

-Box to hold everything
-Water (at least 1 bottle per seat belt in the car, preferably more during the summer or if you live in a hot climate)
-High-energy snacks
-Flashlight
-Batteries (store outside flashlight for longer shelf life)
-Wet wipes
-Toilet paper roll (store easily by rolling off the roll onto your hand and place in a ziplock bag)
-Basic first aid kit
-Blanket/towels
-Change of clothes for children (or yourself if you want)
-Diapers (if you have children)
-Umbrella and/or rain poncho
-Scriptures (or a classic book for reading)
-Jumper cables
-Hand sanitizer
-Pen & Paper
-Pocket knife
-$5-$20 cash (and change)

I got this list off of one of my favorite blogs on food storage. It was on their cold weather preparedness post. Click here to read the complete post.

Banana Nut Muffins

1 cup sugar
2 1/2 cups flour
3 1/2 tsp. baking powder
1 tsp salt
3 TBS oil
3/4 cup milk
1 egg
1 cup mashed ripe bananas
1 cup finely chopped nuts, if desired

Mix first 4 ingredients in a bowl and then add remaining ingredients. Place in muffin tins lined with cupcake holders and bake at 400 degrees for 18-20 min.


I’m posting this recipe because I got an email from my friend, Rhonda. She is now living in Kentucky. Below is a cut and paste of Rhonda’s email.

“I am getting ready to go visit a few sisters this morning from my ward and I thought I would give them a thank you note (for "rising" to the occasion) and make them some banana bread.

The recipe that I now ALWAYS use is the one that I got at my first ever RS Enrichment night... Our lesson was on focusing on the new school year: 'School Days'; I remember as if it were yesterday.

Anyway, now more than 7 years later, I am pulling out that original yellow peace of paper, happily making the banana bread that I never knew how to make before I was a member of this AMAZING church.”

Sunday, October 25, 2009

Demon Eyes Deviled Eggs

Hard-boil 12 eggs. Remove shells, rinse and dry. Slice in half lengthwise. 
Remove yolks and place in medium bowl. Use a fork to mash yolks well. Add mustard and Miracle Whip in a 2-1 ratio to create a paste. Add pickle juice if mixture is too dry.  Add a little green food coloring.  
Fill egg white halves with yolk mixture, rounding and smoothing top of each.  Use black olive slices to create the eyeball effect.  (Optional: use pimiento-stuffed olives...the pimientos look like the pupils). Use a toothpick dipped into red food coloring to draw tiny wiggly red lines on whites, to simulate capillaries.
Yay for the internet!  I made these for a work Halloween potluck.

Roasted Pumpkin Seeds

2 cups pumpkin seeds
1 tsp Worcestershire sauce
3 TBS butter or margarine, melted
1 tsp salt

Rinse pumpkin seeds until pulp and strings are washed off.
Boil seeds in salt water for 10 minutes.  Dry seeds on a paper towel.
In a bowl, combine Worcestershire sauce, melted butter/margarine and salt.  
Add seeds and mix until seeds are coated with mixture.  Spread on a baking sheet.
Bake 1-2 hours at 225*.  Stir occasionally and watch for burning.  Seeds should be crisp.

It was an assignment in my 1st grade class to copy this recipe off the chalkboard.  Ma still has the original recipe written in my very best 6 year-old print.

Tuesday, October 20, 2009

Frightening Witch's Finger Cookies

My neighbor dropped this plate off on my front porch on my birthday. For the spider, she took a chocolate cupcake with chocolate frosting, added chocolate sprinkles, m&m eyes, and black licorice legs. She couldn't find little rope licorice, she took a regular piece of licorice and cut it half and then took the half piece and cut that into four skinny pieces lengthwise. I found this recipe for fingers cookies on kraft.com

1-1/4 cups PLANTERS Sliced Almonds, divided

4 oz. (1/2 of 8-oz. pkg.) PHILADELPHIA Cream Cheese, softened

1/2 cup (1 stick) butter, softened

3/4 cup powdered sugar

1 tsp. almond extract

1/4 tsp. salt

1-1/2 cups flour

HEAT oven to 325ºF.

RESERVE 60 nuts for later use; process remaining nuts in food processor until finely ground. Beat cream cheese, butter, sugar, extract and salt in large bowl with mixer until light and fluffy. Gradually beat in flour. Stir in ground nuts. (Dough will be stiff.)

ROLL dough into 60 (3-inch) "fingers," using 1 Tbsp. dough for each. Place, 2 inches apart, on baking sheets sprayed with cooking spray. Press 1 of the reserved nuts into dough in 1 end of each finger for the fingernail. Use sharp knife to make 3 crosswise slits in top of each finger for the knuckles.

BAKE 15 to 20 min. or until lightly browned. Cool 3 min. on baking sheet; carefully transfer to wire racks. Cool completely.

Another Good Recipe Blog

I added another great recipe blog link to the list of other recipe blogs.

The Jones girls recipe blog. Click here to visit it now.

Debbie is a very good cook, as are her girls and daughter-in-laws.

Enjoy!

Saturday, October 17, 2009

Cream of Broccoli Soup

3/4 cup butter
3/4 cup flour
2 cups (1 pt) half and half
2 cups milk
1 1/2 teas. salt
1/2 teas. sugar
1 bunch broccoli
2 chicken bullion cubes.

Chop broccoli up into bite size chunks. place in pan and fill with enough water to cover broccoli. Cook covered until tender.

In meantime, melt butter, add flour, blend and cook for one minute on low to medium heat, stirring constantly. (Don't let butter brown.)

Add half and half and milk and stir with a wire wish until smooth and thick.

Add half of broccoli chunks to cream sauce. Ostracize the other half with a little liquid from pan and pour into soup mixture

Add 2 bullion cubes to soup mixture and cook on low heat. Add water from broccoli to soup to make soup desired consistency.

Add salt and pepper to taste.

I got this recipe from my sister-in-law, Christy. It is delicious. I don't like to use the chicken bullion cubes because it has MSG in it. (Sometimes people are allergic to msg) Instead of using the chicken bullion cubes, I'll us Swanson's chicken broth and cook the broccoli in the broth. I'll get the chicken flavor from the Swanson's broth.

Wednesday, October 7, 2009

Fixed link

My friend, Rebecca, let me know that the link to the macaroni and cheese recipe didn't work. Ooops. It is fixed now. And you can also get to it here.

Please pass the mac and cheese!

Sunday, October 4, 2009

Yakima Fruit Paste (Home remedy for constipation)

Home remedy for constipation
DOSE: 1 – 2 tablespoons per day

1 lb raisins
1 lb prunes
1 lb figs
4 ounces Senna tea (herbal tea – caffeine free - look for it in your health food store)
1 cup brown sugar
1 cup lemon juice

1. Prepare tea – use about 2 ½ cup boiled water added to tea and steep 5 minutes

2. Strain tea to remove tea leave and add only 1 pint tea to a large pot, then add fruit

3. Boil fruit and tea for 5 minutes

4. Remove from heat and add sugar & lemon juice. Allow to cool.

5. Use hand mixer or food processor to blend fruit mixture into smooth paste

6. Place in plastic container and place in freezer (paste will not freeze but will keep forever in freezer.)

7. Spoon out what you require each day

Enjoy eating it straight off the spoon.
Spread it on toast or add hot water and make a drink.

If the fruit paste is not working (you are not having bowel movements), then you need to increase the amount of fruit paste you are taking.

If the fruit paste makes you have very loose stools, then you need to cut down on the amount of fruit paste you are taking. Perhaps even taking it every other day in some cases.

I ran across this recipe from my past. I made this recipe a lot when I was serving as Relief Society president and was helping the older sisters in our ward. I think the best way to eat is is as a spread on their toast. Anyway, it's one of those recipies that is nice to have on hand.

Thursday, October 1, 2009

Macaroni and Cheese


Click here for a great recipe for homemade macaroni and cheese. The author of the blog "Safely Gathered In" does a great job giving you play-by-play directions on how to make homemade mac and cheese.  And I'll have to say, "amen" to what Abs says about serving this meal:

"Macaroni and Cheese is one of those fall-back meals. Got a babysitter coming in thirty minutes? Mac and cheese it is! Had a bad day? Bring on the mac and cheese! But you don't have to eat those box mixes to get a quick, easy and delicious comfort food. Homemade it is!"

Don't forget to check out the recipe on the link above.

I made up my own recipe for macaroni and cheese.  You can see it by clicking here.

Tuesday, September 29, 2009

Vanilla Butter Frosting

  • 1/3 cup soft butter or margarine (I always use butter)
  • 3 cups confectioners’ sugar ( powdered sugar) 
  • 1 1/2 tsp. vanilla 
  • About 2 tablespoons milk.  (I always end up adding more milk)  

Blend butter, sugar, vanilla and milk. Beat until frosting is smooth and of spreading consistency.

Variations:

Cherry Butter Frosting

Make above recipe. Stir in 2 Tbs drained chopped maraschino cherries and 2 drops red food color.

I usually put about 8 maraschino cherries in a food processor and chop them up that way. Instead of using red food coloring, I add a little bit of maraschino cherry juice. Also, because the cherries have liquid in them I add less milk when I make this frosting. If you don’t use less milk, the frosting will be too runny.

Chocolate Frosting

Make above vanilla butter frosting with this change: Stir in 1/3 cup baking coco into the 3 cups confectioners sugar with a fork before adding the rest of the ingredients.

Peanut Butter Frosting

Substitute peanut butter for the butter; increase milk to 1/4 to 1/3 cup.

These frosting recipes are from my Betty Crocker’s cookbook. These frosting recipes are so easy to make and tastes a lot better than canned frosting. I use this frosting not only to frost cakes, but graham crackers, vanilla wafers, and for decorating sugar cookies. I especially like the chocolate frosting on graham crackers (always Honey Maid brand) and the cherry frosting on vanilla wafers (always Nabisco brand). Frosted graham crackers and vanilla wafers are a quick snack to make up for sack lunches and they are always a big hit the school's lunch room. I usually packed a few extras to be given away or traded with friends. Janelle’s 4th grade class voted her chocolate frosted graham crackers best cookies of the holiday cookie contest when she was in Ms. Mittman’s class.

Friday, September 18, 2009

Some Items Everyone needs in their Food Storage...

I really like this food storage blog. I like how they think about food storage.


I already have these items in my food storage pantry.


Y'all are invited over to my house after the next earthquake and we'll have some of these....


Click here to see the recipe.

Tuesday, September 15, 2009

Cake in a Mug

For the cake mix:

1 box cake mix
1 (4-serving) size box instant pudding mix (not sugar-free)

Stir together cake and pudding mixes. Place 1/2 cup portions in zipper-seal sandwich bags: Label each: "Cake Mix". (There should be about 12 sandwich bags)

For the glaze mix:

4 cups confectioners' sugar (powdered sugar is another name for confectioner's sugar)
6 Tbs. dry flavoring (ex: lemonade, coco)

Stir together glaze ingredients. Put 1/3 cup portions in separate bags. Label each: "Glaze Mix".

Tuck 1 bag of each mix in each of 12 mugs with these instructions:

Mist inside of mug with vegetable oil spray. Add cake mix, l egg white, l tablespoon oil and 1 tablespoon water. Mix well. Microwave on full power 2 minutes.

Stir 1 teaspoon water into Glaze Mix and pour over baked cake.

Click on picture below to see the instruction 
that you can print up and put in the mug with the mixes. 


Makes 12 gift mugs.

Possible flavor combinations:
Lemon cake mix- lemon pudding.
Yellow cake mix-chocolate pudding.
Devi's food cake mix-chocolate pudding.
Pineapple cake mix-coconut pudding
Butterscotch cake mix- butterscotch pudding

I got this recipe out of the newspaper about 10 years ago. (I'm cleaning out my files and ran across it. I thought, I've got to post this!) I gave these away to the sisters in my ward one year. You can buy the mugs from the thrift store or the Dollar Tree. It was a fun, inexpensive gift to give away.

September 13, 2022

I found this recipe online.  It is a lot simpler yet the same results  If you gave it  away as a gift, you'd have to make up another instruction Happy Birthday sheet:

1-2-3 Cake
You need two boxes of cake mix. One can be any flavor you prefer, but the other MUST be Angel Food cake mix.

Mix them together (shake them into a big bowl).

Then simply store the mixture in an airtight container until you get the urge for dessert.

Then just put three Tbsp. of the dry mixture in a big coffee mug and stir in 2 Tbsp of water.\

Microwave it for one minute and you will have a single serving of cake!

Top with fruit, ice cream, whipped cream or whatever! Awesome for those of us who want something sweet every now without making an entire cake!

*Follow Incredible Yummy Recipes for more delicious recipes!

Monday, September 14, 2009

Meat Loaf

1 1/8 lbs ground beef
1/8 lbs sausage
2 eggs
1 small onion, chopped fine
1/4 cup milk
1/2 cup dry bread crumbs
1 1/4 tsp salt
1 1/4 tsp nutmeg

Mix well. Bake at 350 to 375 degrees for about an hour. (You should check it. The altitude makes a difference in the time it takes to bake through.)

Meat Loaf Sauce

1/2 cup ketchup
2 Tbs vinegar
2 heaping tbs brown sugar
1 tsp mustard
1 shot Worhestershire sauce

This is a recipe from my childhood. I copied over the recipe exactly how my mom gave it to me. My mom fixed it often when I was a kid and we loved having meatloaf sandwiches for leftovers. (She would always double the recipe) I was always fascinated to watch my mom mix up the ingredients with her bare hands in a large mixing bowl! Be sure to use the extra lean ground beef. I like to use the Italian Style flavored bread crumbs from Costco (Progresso brand) when it calls for the dry bread crumbs. It gives it added flavor. Also today when I make this recipe for dinner, I'm going to use ground turkey that I bought from Costco. It has no fat and seems to be just as good as any ground round that my mother used. I've never made the meatloaf sauce so I can't comment on it. It was just with my mom's meatloaf recipe, so I thought I'd include it with the post. My mom noted she got this sauce recipe from Marie Redmond.

Friday, September 4, 2009

Mary, Mary quite contrary. How does your garden grow?

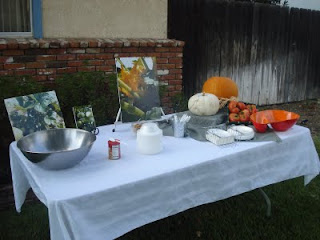
This was our Second Street neighborhood watch block party....


This is some of our garden harvest that I used for the table decorations for our get-together. The pictures were taken by my neighbor, Rebecca, from her garden. The pictures were printed up at Costco photo department and mounted on foam board. It make for a nice way to decorate for a party.

Flying Farmers Chicken Salad

Cook chicken breasts; cool, skin and de-bone Cut into bite size pieces. Combine and let stand overnight in refrigerator.

5 cups diced chicken
2 Tbs orange juice
1 tsp salt
3 Tbs salad oil
2 Tbs vinegar

Next day add:

3 cups cooked white rice
1 1/2 cups seedless grapes
1 1/2 cups thinly sliced celery
1 13 oz. can pineapple tidbits, drained
1 11 oz can mandarin oranges, drained
1 cup toasted slivered almonds
1 cup Best Foods Mayonnaise (May need a little more)
Toss together and serve on lettuce leaf.

I got this recipe years ago from an Arcadia Stake Women's conference luncheon. Insted of using cooked chicken breasts, you can use a Costco rotisserie chicken. I made the above picture for dinner last night. I used brown rice, but didn't like is as much as when it is made with white rice. I also threw in a handful of Craisins (dried cranberries).

Almond Cake

1 cube (1/2 cup) butter - melted

Beat by hand:
3/4 cup sugar and 2 eggs

Then add melted butter

Add 3/4 cup flour and 1 tsp almond flavoring

Stir together and pour in greased pan. (I use a Marie Calender pie tin)
Sprinkle slivered almonds on top

Bake at 350 degrees for 25 minutes.

This doesn't get the beauty award for looks but it makes up for it in taste. (How could it not taste good with 1 cube of butter in it!) I got this recipe from my sister-in-law, Christy. It is an easy recipe. I usually triple the recipe when I make it. I made it for Scott's administrator work breakfast this morning. I buy my almond flavoring from my favorite store, Smart and Final.

Sunday, August 16, 2009

Italian Chicken and Couscous

This is couscous (pronounced cooz-cooz)

1 TBS oil (olive)
2 cloves garlic, finely chopped
1 can (14 1/2 oz) DICED stewed tomatoes, drained and 1/2 cup liquid reserved
1 lb. boneless, skinless chicken breasts, cut into 1/2 inch strips
1 medium onion, thinly sliced and separated into rings
1/2 tsp dried oregano leaves
1/8 tsp pepper
1 1/2 cups chicken broth
1 medium zucchini, cut lengthwise in half, then cut crosswise into 1/4 inch slices
3/4 cup couscous

Heat oil in skillet over medium heat.  Cook garlic in oil, stirring frequently.  Stir in reserved tomato liquid, chicken, onion, oregano, and pepper.  Heat to boiling; reduce heat.  Cover and simmer about 10 minutes, until chicken is no longer pink in center. [NOTE: cooking with raw chicken makes me nervous.  I will use a rotisserie chicken or chicken that I have previously cooked.]  Stir in broth; heat to boiling.  Stir in zucchini, couscous and tomatoes; remove from heat.  Cover and let stand about 5 minutes or until couscous is tender and liquid is absorbed.

Couscous is super tiny pasta--little tiny balls that make it look like a grain.  Find it in the pasta aisle or with the ethnic food.  College roommate Jess introduced me to the beauties of couscous.  I don't know if I've ever made this recipe with zucchini (since I never buy it).  Usually I use bell peppers. 

Rice Pudding

1 cup water
1/2 cup rice
4 cups milk
3/4 cup butter
3 eggs
3/4 cup sugar
1 TBS vanilla

Boil water.  Add rice, cook until water gone.  Add milk and butter.  Cover and simmer for 1 hour.  Whip eggs and sugar together with beaters.  Pour slowly into rice mixture, stirring as you go.  Simmer 5 more minutes.  Add vanilla.  Mix and serve.

I'll be honest...the thought of rice pudding always made me a little nauseous.  But I've had TWO roommates now that make it when they need a little comfort food in their life.  And comfort food it is!  Good stuff, warm or cold.  When it's cold, it's reminiscent of ice cream.  Yum.

Ratatouille

(yes...like the movie)

1 medium unpeeled eggplant, cut into 1/2 inch cubes
2 small zucchini, cut into 1/2 inch slices
1 medium green bell pepper, chopped (1 cup)
1 medium onion, finely chopped (1/2 cup)
2 medium tomatoes, diced in large pieces
1/4 cup oil (olive)
1 1/2 tsp salt
1/4 tsp pepper
2 cloves garlic, finely chopped

Cook all ingredients in large skillet over medium heat 10-15 minutes, stirring occasionally, until zucchini is tender.

This is courtesy of Betty Crocker.  (And, according to Betty, it's only 12o calories per serving!)  I tried it out because I visited a farm and had lots of fantastic fresh vegetables (including the eggplant.  I've never cooked eggplant before!--hence the new recipe.)  I ate this with yummy wild rice and it would be great accompanying some teriyaki/grilled chicken.  Eat it for dinner then watch the movie!

Friday, August 7, 2009

Helpful Hint

So...last night I was making Hawaiian Meatballs (what a fabulous recipe, by the way...you should try it out!) and I needed bread crumbs. Well, I think I've bought real bread crumbs once in my life, and I sure didn't have any on hand last night. Usually I just crush up saltine crackers and use those. But I was fresh out of saltines too! So I used the next best thing--CHEERIOS! And they worked great. They crushed up nicer than saltines and didn't contribute a weird taste like I was afraid they might. I think I'm going to use Cheerios every time now!

Monday, August 3, 2009

Unfried Chicken (or Fish)


1 cup bread crumbs
1 Tbs grated Parmesan cheese
1 tsp oregano or Italian seasoning
1/2 tsp salt
1/4 tsp pepper
2-3 Tbs vegetable oil
2 1/2 - 3 1/2 lbs chicken pieces, or one medium chicken cut up

Preheat the oven to 375 degrees.

In a plastic or paper bag combine the bread crumbs, Parmesan cheese, oregano, salt, and pepper. Hold the top of the bag shut and shake to mix everything together.

Pour the vegetable oil into a small bowl and, using a pastry brush (or clean paintbrush), brush the chicken pieces with the oil. Put 2 or 3 pieces of chicken at a time into the bag, and shake them until they are well coated with crumbs. Take them out of the bag and put the pieces on a rack that has been placed on a baking sheet. (The rack allows the fat to drain away from the chicken.)

Bake at 375 degrees for 25 minutes, turn the pieces over and bake for another 20 to 25 minutes, until golden brown. You can be sure the chicken is done if the juice runs clear (not pink ) when you poke a for into it.

Makes 3 or 4 servings

Fish option: Use 1 lb fish fillets instead of chicken pieces in the above recipe. Bake for 10 to 20 minutes until the fish flakes when you try to pry it apart with a fork.

This recipe is from the cookbook “Clueless in the Kitchen” by Evelyn Raab. That is why the directions are in such detail. Scott’s mother gave this cookbook to the girls as they left for college. It is a great cookbook to give as a gift to someone who is leaving home and cooking on their own for the first time.

Rachel made this recipe the other day for dinner. She served it with rice cooked in chicken broth, and garden fresh tomatoes. Yum! She made it out of chicken tenders that we had on hand in the freezer. Before she coated the chicken with the breadcrumb mixture she defrosted them in the microwave by placing them in a microwave on a plate on high for one minute. Then she ran the pieces under cold water to finish the defrosting process. She also used Italian style seasoned bread crumbs that we had on hand in our 3 month food storage.

Wednesday, July 29, 2009

Another good web site

I ran across this web site recently while we were on vacation. I think I read about it in the Deseret News. I saw that on the home page there links to recipes and menu ideas.

Sometime I think I can spend the whole day surfing the net looking at all the cool things that people post online.

http://superhealthykids.com/

I put a link to it under other recipe blogs to the right of this page - Healthy Families

Have fun surfing.....

Tuesday, July 21, 2009

Grapefruit Appetizer


2 cups water
2 cups sugar
Boil long enough to dissolve sugar

4 cans (15 oz size) grapefruit
Blend in blender, including juice, to break up pieces.

1 cup maraschino cherries, chopped small (or blended).  Use some cherry juice, but not much

Juice of 1 large lemon (or lime)

Mix all together and freeze in 9 x 13 pan.

Serve a scoopful of frozen mixture in a glass of 7 Up.
I serve the slush with diet soda, because the slush already has a lot of sugar in it. 

Keeps a long time.  Serves a very large group.

The Kroger brand makes "Ruby Red Grapefruit sections in light syrup" in the 15 oz size. I found them at Ralphs grocery store.  I also found Del Monte brand 15 oz cans at Walmart.   I used my mini food processor to cup the cherries very small.  Since we have a lime tree, I have also used the lime juice instead of the lemon juice.  I also buy the maraschino cherries from Smart and Final.  They are cheaper there.

This is a recipe from my childhood, so that means the recipe is over 40 years old. Yikes! I copied the recipe exactly how it was 40 years ago.  I have to say that this is a very good slush appetizer. I don't know why I don't make it more often. As a kid I used to love to eat the slush without the soda.


Interesting Web Pages


I got this link from the columnist Mary Hunt about $5 a meal. It looked interesting, so I thought I'd post it on this blog. Check it out!

Mary Hunt's web page:

http://www.debtproofliving.com/

$5 a meal web page:

http://www.5dollardinners.com/

Wednesday, July 1, 2009

Natural Fruit Juice Knox Blox

From this post you will learn how to get from this:

To this:

Ingredients

4 c Juice, such as apple or grape
4 Envelopes Knox Gelatine (each envelope holds 1 Tbs Knox Gelatine)

Instructions

In medium saucepan heat 3 cups juice to boiling. Meanwhile, in large bowl, sprinkle Knox Unflavored gelatine over remaining 1 cup cold juice; let stand 1 minute. Add hot juice and stir until gelatine is completely dissolved, about 5 minutes. Pour into 8 or 9-inch baking dish; chill until firm, about 3 hours. Cut into 1-inch squares.

MICROWAVE DIRECTIONS: In 2-cup glass measure, sprinkle Gelatine over 1 cup cold juice; let stand 3 minutes. Microwave at high 1 minute 20 seconds; stir thoroughly. Let stand 2 minutes or until gelatine is completely dissolved. Pour int 8 or 9-inch baking dish; stir in remaining 3 cups juice. Chill as above. **Try using assorted cookie cutters to create fun shapes.

Kerry Lawrence told me about these made with fruit juice. She likes to make them for her grandkids because it uses fruit juice instead of sugary jello. (Although I think fruit juice also has a lot of sugar in it.) Sam requested that we make it today and we used Ocean Spray Light Cran-Grape juice.

Tuesday, June 30, 2009

Perfectly Hard-Cooked Eggs

Place Eggs in single layer in a medium sauce pan. Completely cover with cold water. Cook over medium-high heat until water comes to a rapid boil. Remove from heat, cover, and let stand 15 minuets. Drain. Run under cold water or place in a bowl of ice water until cool.

I was in the waiting room of Sam's orthodontist reading Better Homes & Garden Magazine when saw this tip for perfectly hard-cooked eggs. I was excited to share this tip.

Sunday, June 14, 2009

Oatmeal Cookies

3/4 cup shortening
1 cup brown sugar (packed)
1/2 cup granulated sugar
1 egg
1/2 cup water
1 tsp vanilla
l cup all-purpose flour
1 tsp salt
1 tsp cinnamon
1/2 tsp soda
1/2 tsp cloves
1 cup raisins
1 cup chopped nuts (optional)
3 cups quick-cooking oats

Heat oven to 350 degrees. Mix thoroughly shortening, sugars, egg, water and vanilla. Stir in remaining ingredients.

Drop dough by teaspoons 1 inch apart onto greased baking sheet. Bake 12 to 15 minutes or until almost no imprint remains when touched with finger. Immediately remove from baking sheet. Store in tightly covered container.

About 5 dozen cookies.

This recipe is from my Betty Crocker's cookbook. It is my favorite oatmeal cookie recipe. Sam requested that I post this recipe.

Later....

At times I get a little frustrated with this recipe. When I cook the cookies they seem to need need more oatmeal or flour, so I usually end up adding more oatmeal. My goal is to find the perfect oatmeal cookie recipe. I just came across this site dedicated to teach you how to make the perfect oatmeal cookie. Check it out here. Be sure to click onto the recipe link.

Saturday, June 13, 2009

Phony Homemade Ice Cream

1/2 gallon vanilla ice cream
1/2 gallon sherbet flavor of your choice. (We like pineapple or raspberry sherbet. Albertsons has great sherbet.)
4 ripe bananas
1 package frozen berries mixture of your choice

Soften ice cream and sherbet. Put in big bowl. Add thinly sliced bananas and frozen berries. Stir with sturdy spoon. Serve immediately. Put leftovers in a container and store in freezer for future enjoyment.

I got this recipe from my Sister-in-law, Christy. It is a delicious easy dessert for summer entertainment. I'm serving it tonight for a dinner I'm hosting for Scott's school administrators. (I mixed it up at 3:00. dinner is at 5:30. After I mixed up the "ice cream" I put it back into the sherbet and other plastic containers and put them in the freezer until we were ready to serve dessert after dinner.

Awesome Food Storage Blog

I just ran across the most wonderful food storage blog. I wanted to share the address on my blog.

http://safelygatheredin.blogspot.com/

You might want to bookmark this one. It looks like a great reference for food storage. I will also post it on the side of my home page.

Monday, June 8, 2009

Strawberry Poppy Seed Dressing

2 C Mayonnaise
1/3 C half and half
2/3 C sugar
3-4 tablespoons strawberry vinegar (Can you buy this? I'll have to check it out.)
1 tablespoon poppy seeds
3-4 tablespoons strawberry jam
A few drops of red food coloring
Cream together, pour over lettuce and sliced strawberries

My mom sent me this recipe this morning. It looked so good, I was excited to post it. This is what she said about the recipe:

"I finally got a copy of an excellent salad dressing recipe. They used it at a Stake Relief Society social where I was working in the kitchen. This recipe makes a very large amount, so, just cut it down. They put the salad on individual plates with the dressing on it and sliced strawberries on top. I cut the strawberries with an egg slicer. The slices were the perfect thickness."

When I made this dressing, I couldn't find any strawberry vinegar, so I just used rice vinegar instead and it tasted great.  Also, I don't add the half and half because I don't ever have it on hand.  Because there isn't any half and half in the dressing, I add a little extra rice vinegar to thin the dressing down.  I also don't add the red food coloring.  I'm fine with the light pick color the strawberry jam  gives it.  I use homemade strawberry jam when I make this recipe.  You can find out how to make strawberry jam by clicking here.

11/30/2021

After making this recipe for 12 years, it has morphed into this simple delicious recipe:

1 cup mayonnaise  
1/3 cup sugar
1/4 cup rice vinegar
1 1/2 tsp poppy seeds
1 1/2 Tablespoons homemade (made from Sure Jell) strawberry freezer jam 

Mix it all together and enjoy. 


Tuesday, May 26, 2009

Pasta with Ham and Asparagus

1 lb bowtie pasta
1/4 cup olive oil
2 cloves garlic
1 shallot (related to an onion), thinly sliced
1 lb asparagus
1 cup frozen peas
1/4 lb prosciutto (ham), chopped
1 cup Parmigiano-Reggiano cheese (you can use freshly grated Parmesan or Romano)
1 cup fresh basil leaves (abt. 20 leaves)

Cook pasta. While that is going, saute sliced shallot with garlic in olive oil. Halve each stalk of asparagus lengthwise, then cut into 2 inch pieces. Add asparagus to shallot/garlic. Add a couple ladles of water from the noodles and cook until asparagus is tender-crisp. Drain pasta and add to asparagus. Add peas and prosciutto. The peas should warm through quickly. Toss with cheese and remove from heat. Season with salt and pepper and serve in shallow bowls with lots of fresh basil on top.

Don't let the fancy ingredients fool you--this is really very easy. It's from my neighbor Ashlee and it's one of my favorite meals that she makes. It's pretty impressive looking, too. Fool all your friends into thinking you're a gourmet chef.

Wednesday, May 20, 2009

Homemade Salsa


1 large can (28 oz) of whole tomatoes
1 small handful of fresh cilantro (chopped fairly small)
1/4 to 1/2 chopped onion
3 to 6 fresh tomatoes diced
1/2 - 1 whole fresh jalapeño (it depends on how spicy you want your salsa)
fresh lemon or lime juice to taste (I like to use the juice of one lime)
minced garlic to taste
salt to taste (approx. 1/2 - l tsp)

Blend canned tomatoes and jalapeño peppers in blender or food processor for a few seconds until frothy and fairly well blended). Then place blended tomatoes in large bowl. Add chopped fresh tomatoes, chopped onion, Cilantro, Lemon or lime juice, garlic, and salt. Stir ingredients to mix them. Store in covered containers in refrigerator overnight or several hours prior to serving to allow flavor of salsa to reach it’s potential and enjoy! This salsa has a nice chunky texture.

This recipe is from Debbie Jones who learned how to make salsa from Rosa Sandavol. Rachel learned how to make it in Relief Society from Debbie. Rachel says it is the most useful thing she learned to make at Enrichment night.

Friday, May 15, 2009

Family Home Storage: A New Message


Being a member of the Church of Jesus Christ of Latter-day Saints all my life, I have always been taught about preparedness and food storage. I'm grateful for the teaching from our church leaders on this subject. I appreciate a new article that the church has published on family home storage. You can read the entire article by clicking here. Below is a cut and paste of the highlights that I liked from the article.

“We can begin ever so modestly,” President Hinckley explained. “We can begin with a one week’s food supply and gradually build it to a month, and then to three months.”1

Sister Jeffries notes that “the beauty of this system is its appropriateness for families just starting their storage programs, as well as for those living in small homes and apartments, where space is at a premium. President Hinckley clearly recognized that change and adaptation are needed so that all of us might benefit from the Lord’s inspired program.”

A New Approach

In the spirit of President Hinckley’s remarks, Church leaders decided to closely reexamine their approach to self-reliance, looking for ways to reinforce the concepts of home storage and financial preparedness. As a result, the Church published the pamphlet All Is Safely Gathered In: Family Home Storage, outlining new guidelines for home preparedness that give Church members a simplified, four-step approach to building their home storage.

They are as follows:

1. Gradually build a small supply of food that is part of your normal, daily diet until it is sufficient for three months.

2. Store drinking water.

3. Establish a financial reserve by setting aside a little money each week, and gradually increase it to a reasonable amount.

4. Once families have achieved the first three objectives, they are counseled to expand their efforts, as circumstances allow, into a supply of long-term basic foods such as grains, legumes, and other staples.

Of the new guidelines, Presiding Bishop H. David Burton says, “Our objective was to establish a simple, inexpensive, and achievable program that would help people become self-reliant. We are confident that by introducing these few, simple steps we can, over time, have more success.”

Guideline 1: Build your three-month supply gradually.
Start small and do the best you can. Begin by purchasing a few extra items to add to your storage each week. Strive to build a one-week supply; then expand it to a one-month supply, then a three-month supply. By building your supply slowly, you can avoid financial strain and start down the path toward self-reliance.

The Lugo family of Valencia, Venezuela, learned that this new approach of starting small and being consistent can pay big dividends. After listening to general conference, Brother Omar Lugo, a Church member in the Falcón Venezuela District, felt inspired to begin his own home storage. He discussed the matter with his family, and they agreed to follow the prophet’s counsel.

They began setting aside food, water, and money, a little at a time. At first the difference was hardly noticeable. But after a while the Lugos found that they had accumulated a substantial reserve. Several months after they began building their home storage, a worker’s strike in Venezuela put many local workers’ jobs in jeopardy. Brother Lugo was among those who eventually lost their jobs.

For a time his family lived on savings. Seven months later the Lugo family was relying exclusively on the food they had stored. It took nearly two years for Brother Lugo to find work again, but his family was able to survive the difficult challenges of unemployment. They had built their reserve gradually, and when adversity struck, they were prepared and the Lord blessed them.

Like the Lugo family, Church members will be blessed for their obedience to the First Presidency’s counsel as they gradually build home storage. “We ask that you be wise as you store food and water and build your savings,” the First Presidency explains. “Do not go to extremes; it is not prudent, for example, to go into debt to establish your food storage all at once.” Rather, they suggest a modest, consistent approach. “With careful planning, you can, over time, establish a home storage supply and a financial reserve.”2

Guideline 2: Store drinking water.

In times of need, having water to drink can be the difference between life and death—or at least between peace and anxiety. Just ask the Kawai family, members of the São Paulo Brazil Stake. They have been storing food and water for 20 years. Although their small apartment doesn’t have much room to spare, the Kawais decided to make home storage a priority.

Sister Kawai tells of one experience when that decision paid off. “I was in the hospital having just given birth when I learned that there was a problem with the city’s water pipes,” Sister Kawai explains. “Hundreds of thousands of people were without water. But I wasn’t concerned about going home. I had peace of mind knowing that my family would have water to drink.”

Guideline 3: Set aside a little money.

From the First Presidency comes this counsel: “We encourage you wherever you may live in the world to prepare for adversity by looking to the condition of your finances. We urge you to be modest in your expenditures. … Save a little money regularly to gradually build a financial reserve.”3

In the April 2007 general conference Bishop Keith B. McMullin, Second Counselor in the Presiding Bishopric, reinforced this principle, exhorting Church members to “save some money, if only a few coins each week. This modest approach will soon enable them to have several months’ reserve.”4

By gradually building a financial reserve, we will be prepared for unforeseen trials and have an added measure of security and peace in our hearts.

Guideline 4: Where possible, gradually establish a longer-term supply.

“For longer-term needs,” explains the All Is Safely Gathered In pamphlet, “gradually build a supply of food that will last a long time and that you can use to stay alive, such as wheat, white rice, and beans.”5

Establishing long-term storage is easier than some might think. Dr. Oscar Pike and his colleagues in the Brigham Young University Department of Nutrition, Dietetics, and Food Science have done several in-depth studies on long-term food storage. They discovered something surprising: properly packaged and stored low-moisture food retains much of its sensory (taste) quality and nutritional value for 20 to 30 or more years after being placed in storage—much longer than previously supposed.

This means Church members can store certain foods long-term without the worry of regularly rotating the food. They can be confident that their supply will be there to keep them alive if they have nothing else to eat.

The Time to Begin Is Now

“Perhaps in the past accumulating a year’s supply of food may have been a little intimidating and even illegal in some places,” says Dennis Lifferth, managing director of Church Welfare Services. “But this new approach asks us to do the best we can, even if all we can do is to set aside a can or two each week. If the prophet asks us to do something, we can find a way to fulfill the commandment and receive the blessings.”
“This new program is within everyone’s grasp,” explains Bishop Burton. “The first step is to begin. The second is to continue. It doesn’t matter how fast we get there so much as that we begin and continue according to our abilities.”

Prophetic Counsel about Home Storage

“Many more people could ride out the storm-tossed waves in their economic lives if they had their … supply of food … and were debt-free. Today we find that many have followed this counsel in reverse: they have at least a year’s supply of debt and are food-free.”

President Thomas S. Monson, “That Noble Gift—Love at Home,” Church News, May 12, 2001, 7.

“Everyone who owns a home recognizes the need for fire insurance. We hope and pray that there will never be a fire. Nevertheless, we pay for insurance to cover such a catastrophe, should it occur. We ought to do the same with reference to family welfare.”

President Gordon B. Hinckley (1910–2008), “To Men of the Priesthood,” Liahona and Ensign, Nov. 2002, 58.

“In the day of plenty, prepare for the day of scarcity.”

First Presidency, “Message of the First Presidency,” in Conference Report, Apr. 1942, 89.

“Learn to sustain yourselves; lay up grain and flour, and save it against a day of scarcity.”

President Brigham Young (1801–77), Discourses of Brigham Young, sel. John A. Widtsoe (1954), 293.

Notes
1. Gordon B. Hinckley, “To Men of the Priesthood,” Liahona and Ensign, Nov. 2002, 58.
2. All Is Safely Gathered In: Family Home Storage (2007), 1.
3. All Is Safely Gathered In: Family Finances (2007), 1.
4. Keith B. McMullin, “Lay Up in Store,” Liahona and Ensign, May 2007, 53.
5. All Is Safely Gathered In: Family Home Storage, 2.

PETE Bottles for Food Storage


Below is a cut and paste from the provident living that explains how to store food in plastic containers. You can get to the post by clicking here then click onto the PETE Bottles Link. If you want to learn about recycling symbols click here and scroll down to where it explains about PETE symbols.

PETE Bottles for Longer-Term Storage

Bottles made of PETE (polyethylene terephthalate) plastic can be used with oxygen absorbers to store products such as wheat, corn, and dry beans. PETE bottles are identified on the container with the letters PETE or PET under the recycle symbol (see above picture).

Other types of plastic bottles typically do not provide an adequate moisture or oxygen barrier for use with oxygen absorbers. Do not use containers that were previously used to store nonfood items.

PETE bottles can also be used for shorter-term storage (up to 5 years) of other shelf-stable dry foods such as white rice. Visit providentliving.org for specific product recommendations.
Moisture content of stored foods should be about 10 percent or less. When moist products are stored in reduced oxygen packaging, botulism poisoning may occur.

Packaging in PETE Bottles

1. Use PETE bottles that have screw-on lids with plastic or rubber lid seals. You can verify that the lid seal will not leak by placing a sealed empty bottle under water and pressing on it. If you see bubbles escape from the bottle, it will leak.
2. Clean used bottles with dish soap, and rinse them thoroughly to remove any residue. Drain out the water, and allow the bottles to dry completely before you use them for packaging food products.
3. Place an oxygen absorber in each bottle. The absorbers can be used with containers of up to one-gallon capacity (4 liters). Additional instruction about using oxygen absorbers is available at providentliving.org. (This is now Kathleen typing - I don't do this step when I am storing food for my 3 month supply. I have found that the oxygen absorbers work in PETE containers only if the lids to the containers have a rubber ring on them at are found on containers such as a gallon water jug.)
4. Fill bottles with wheat, corn, or dry beans.
5. Wipe top sealing edge of each bottle clean with a dry cloth and screw lid on tightly.
6. Store the products in a cool, dry location, away from light.
7. Protect the stored products from rodents.
8. Use a new oxygen absorber each time you refill a bottle for storage.
Where to Get Oxygen Absorber Packets

Oxygen absorber packets are available at home storage centers and Church Distribution Services, or they can be ordered online at ldscatalog.com. Unused oxygen absorbers can be stored in glass jars with metal lids that have gaskets.


This picture is a sample of some of the things I have stored in PETE containers. (Click onto the picture to see a close up of the items stored, AND, yes! chocolate chips are an important item in our 3 month food supply).

After reading this post you will soon learn to recognize #1 PETE recycled containers as compared to a #2 PETE recycled container. (An example of a #2 recycled container is a milk jug.)

This post comes from cut and past off the church web page: providentliving.org. Learning about PETE storage containers has changed the way I do our family's food storage. I use PETE #1 containers to store the food that we use regularly. Using the PETE containers has made it easier for me to rotate the staples we use most. I take a permanent marker and date the container each time I fill it. The items I store in PETE containers would include items such as: Rice, Oats, sugar, flour, cereal, jello, popcorn, cornmeal, powdered sugar, noodles, etc. I use the wide mouth containers for items that as I need to scoop out with a measuring cup, such as flour. I use the small opening containers for items that I can pour out such as white sugar. I order the wide mouth PETE container, on line from www.FreundContainer.com - item #34798. For the small opening containers that I can pour the food out of such as rice, I use recycled l gallon PETE water bottles such as a Crystal Geyser containers.

Wednesday, May 13, 2009

Chicken Tortilla Soup


You Will Need
3 corn tortillas (6 inches each), cut into 1/4-inch strips
4 tsp. olive oil, divided
1/4 tsp. salt
3/4 lb. boneless, skinless chicken breasts, cut into 1/2-inch chunks
1 large onion, chopped
5 cups reduced-sodium chicken broth
1 lb. red potatoes, cut into 1/2-inch cubes
1 cup frozen corn
1 can (4 1/2 oz.) chopped green chilies
1/4 cup minced fresh cilantro
1/4 tsp. pepper
3 tbs. lime juice

What to Do
1. In large resealable plastic bag, combine tortilla strips, 1 tsp. oil, and salt. Seal bag and shake to coat. Arrange tortilla strips on ungreased baking sheet. Bake at 400°F for 8 to 10 minutes or until crisp, turning once. Remove to paper towels to cool.
2. In large saucepan, sauté chicken in remaining oil until lightly browned. Add onion; cook, stirring frequently, until onion is tender. Add broth and potatoes. Bring to a boil. Reduce heat; cover and simmer 10 minutes. Add corn, chilies, cilantro, and pepper, and heat through. Stir in lime juice. Top each serving with tortilla strips.

Yield: 6 servings ($1.62 per serving)

-- M. M., Traverse City, Michigan

Nutrition Facts: One serving (1 1/2 cups) equals 221 calories, 4 g fat (1 g saturated fat), 33 mg cholesterol, 757 mg sodium, 27 g carbohydrate, 4 g fiber, 19 g protein.

I got this recipe from the Reader's Digest Magazine. I just made this for our dinner tonight and I can hardly wait to serve it. It's nice to be able to use fresh limes from our lime tree. (I also added 1 cup homemade or store bought salsa for extra flavor.) I didn't have any frozen corn on hand, so I used canned corn. I also used fresh chopped jalapeño pepper sautéed with the onion instead of the canned green chilies. I serve this soup with store bought tortilla chips and don't make my own tortillas as shown in step #1. That's the nice thing about making homemade soup.... You can take the original recipe and doctor it up any way you want to suit your taste .

January 29, 2022
I can't believe I've been making this recipe for over 10 years.  I have more more changes (added to the changes above) that I use as I make this.  Soo, this is what the above recipe has morphed into:  

I use a rotisserie chicken from Costco for the meat.  I'll buy the chicken, debone it, and divide the chicken meat into 3 portions.  As I debone the meat, I put the skin and bones into a pot, cover the bones and skin with water, and boil it for about 1 hour.  Then I remove the bones and skin, skim off the grease, and divide  the broth into 3 equal parts. (It's about 1 1/2 cup broth x 3)  I will use one portion of  the meat and one portion of the broth for each time I make this recipe.  I put the other 2 portions in the freezer to use the next time I make the recipe.  

As I make the recipe, I first cook the cubed potatoes for 14 minutes in enough water to cover the potatoes. (Before I cook the potatoes I rinse them to rinse off the starch)  As the potatoes are cooking, I cook the onions, jalapeño peppers, and some minced garlic in butter with some Mrs. Dash seasoning (to taste) in a sauce pan.  When the potatoes are done cooking, 

I add the following ingredients to the pot of potatoes including the water the potatoes are boiled in.:

Cooked onions, jalapeño peppers, and garlic
1/3 Costco rotisserie chicken
1/3 broth made from 1 Costco rotisserie chicken bones and skin that has been boiled (it is about 1 1/2 cup broth
1-2 cups frozen corn
1 cup salsa
lime juice to taste
chopped cilantro to taste

Farming in the City


Here in the big city of Duarte, we can enjoy fresh garden vegetables year round. In the winter we like to grow lettuce, peas, broccoli, and cilantro. In the summer we grow tomatoes, bell peppers, squash, cucumber, pumpkins, strawberries, lettuce, peas, zucchini, cilantro, cucumbers, carrots, green beans and what ever else looks good in the vegetable pony packs in the garden department at the Home Depot or Walmart. Some plants I start from seeds, such as cilantro and lettuce. Other plants I use the pony packs such as tomatoes and peppers.


Below are some pictures of city farming here in Duarte:


My neighbor, Rebecca Seamons has a nice grow box in her back yard. The first picture above is where she planted basil by her tomatoes plants to keep away the bugs.


In this grow box she has bell peppers, squash, and strawberries.


This is in our backyard. To the left are strawberries. To the right are peas and tomatoes.
This garden plot is along our back fence. In this shot you can see cucumbers, lettuce, red peppers, tomatoes and squash.

This is a picture of our compost pile between our two citrus trees. We throw our lawn clippings, and kitchen scraps such as melon rinds and carrot peels there. When it breaks down, we add the soil to our garden plots.


There are many gardening tips at providentliving.org Have fun!